
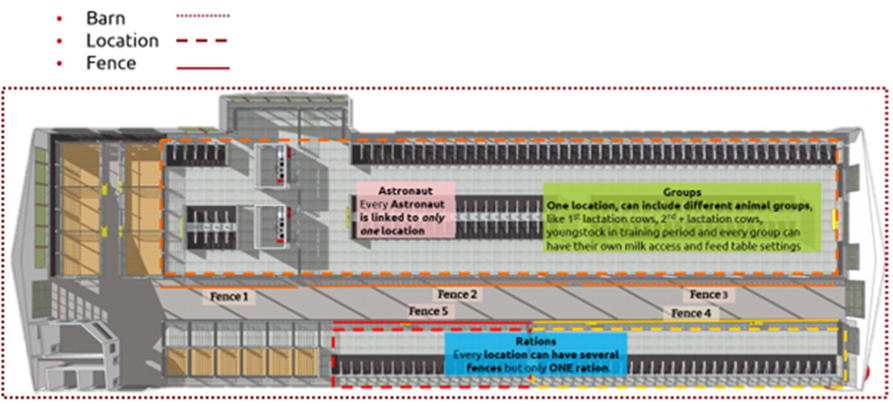
The Fence page in Horizon is designed to help you manage all your fences efficiently. A fence is a physical area where the Vector can feed, and it is located within a specific location in the barn. A barn can consist of several different locations, where one location is an area where a group of animals is housed and fed the same ration. Note that a location can have multiple fences, but all fences within the same location share the same ration.
Image 1: Barn floor plan - dotted lines are locations, e.g. milking cows (orange), dry cows (red) and young stock (yellow).
The Fence overview page
You can access the Fence Overview Page via 2 different ways:
Feeding Dashboard > Fence in the top bar Manage > Feed > Fence
On the left side of the overview page, location
Mobile usage
The fence page is also available on mobile. Here the rations can be changed per location via the dropdown option. For the fences, you can set the same options as in the desktop version, only as single entries and no batch entries. It’s possible to filter the fence page based on locations or rations.
Location Settings
On the overview page, the rations linked to each location are displayed and can be easily changed via a dropdown menu. If you want to learn more about how to create or edit locations, please go here. Selecting the checkbox in front of a location will select all related fences. Clicking on a location will show the following settings:
Location Type: Dairy cows, dry cows, young stock, or beef. These types are useful when analyzing Vector data based on location type.Description: Additional details about the location.
Fences in this Location: Click on a fence to change its settings.
Reporting Settings
Animal Registration Method: Automatic or manual. Fat and Protein Correction. Rest Feed
Reporting Settings - Animal registration method
There are two ways to register animals:
Manual Registration: Input needs to be manually entered via the location page.
Manually register the number of animals per location (mainly for beef or Vector-only farms). Selecting "View History" will display all historical animal numbers, which can be edited or deleted if needed.
Beef Location type: Requires the date, number of animals, weight (kg), and whether a new beef round has started (fill in age at start in days).Dairy Location type: Requires the date, number of animals, average production (kg), average protein percentage, and average fat percentage.
Automatic Registration: Based on location changes performed in Horizon.Every animal is always assigned to a location, visible on the cow card or report 17.After a device visit (Astronaut, Grazeway, or Cosmix), the animal’s location will automatically change to the device location, as linked in the device configuration page.If not visiting again after 24 hours, the cow will not be registered in Vector reports, but the location on the cow card/report 17 will remain the same.At dry-off, the animal will be moved to the selected location in the dry-off modal.
Reporting Settings - Fat and protein correction
When enabled, feed efficiency is based on Fat and Protein Corrected Milk (FPCM) production, using the formula: FPCM= ( (0.337 + (0.116 * Fat %) + (0.06 * Protein %) ) * kg Milk
This value is used for feed efficiency in Vector reports (e.g., report 72) and feed efficiency KPI on the dashboard with the following formula:
Feed efficiency = FPCM / (concentrate from Astronaut (- rest feed from Astronaut) + roughage (Dosed weight - % rest feed) + minerals.
If disabled, the calculation uses kg milk instead of FPCM.
Reporting Settings - Rest feed
Rest feed is uneaten feed that you don't want to feed to the cows anymore. Filling in this value, only impacts feed efficiency calculations (Note: When you enter a rest feed percentage, this adjustment impacts not just current values but also all past data). Common default values for rest feed: 1-5%, where 1% is generally accepted and 5% indicates poor ration quality. Generally, it is removed every 3 days, depending on the ration quality.
Measurement method:
Remove all rest feed. Let the Vector feed as usual. Removing all rest feed after a set period (e.g., 3 days). Weigh all the rest feed. Comparing the weight of the rest feed to the dosed weight. Calculating the rest feed percentage and entering it into Horizon.
Fence settings
You can change settings directly on the main screen, such as activating/deactivating automatic feeding, adjusting feed heights, dosing weight, and setting temporary feed heights and feed pauses. Locations and fences can be sorted alphabetically. This sorting will be remembered when returning to the fence page again.
Additional settings can be done in a batch entry, by selecting multiple fences at once or a single entry:
Automatic feeding: If automatic feeding is activated, fences will be fed automatically based on deviating feed heights and route settings. If this is deactivated, the Vector will not automatically feed here.Dosing weight per feed fence: The dosing weight is the amount of feed provided per fence. The calculation is set up in collaboration with FMS and is based on the number of animals, their daily feed intake, and the number of feeding times. Since the Vector is a self-learning machine, it can be challenging to make precise predictions and calculations manually. Additionally, dosing speeds can vary due to differences in feed length, quality, or dry matter percentage (DM%). To optimize feeding, it's best to let the MFR handle the adjustments. If the fence is too short or if the feed is not dispensing smoothly from the bin, the Vector will automatically reduce the dosing weight to ensure efficient feeding.Minimum feed height: How much feed do you want there to be at least at the fence? The feed height functions as a buffer to make sure there still is enough feed available until the Vector has prepared a new batch. When feed heats up quickly, for example in summer, you may want to lower the feed height. Temporary feed heights: You can set a different feed height for a certain period of time. When you hoover over the feed height, the time it's active will be shown. This can be useful, for example, when you want to make a buffer because the Vector is out of operation for maintenance or during feed peaks. Fence pause settings: This setting ensures that the MFR will not feed the fence. However, the MFR will continue pushing and scanning the feed height. You can turn this setting on if you do not want the Vector to feed during a certain period of time. This can be the case when, for example, the cows are grazing. It is important to know that the MFR will still be driving and scanning the feed height. (If you do not want the MFR to drive at all, you need to turn on a route pause.)
Maximum load and dosing weight
The dosing weight is limited by the maximum load as set on the mixed ration page (physically, how much the MFR can take per load). However, if there is a wish by the farmer to have a higher dosing weight than is possible with the max load, a pop up will be shown, indicating an advice to lower the amount or when continuing, the MFR will split feeding into multiple loads, possibility affecting mixing quality and efficiency. You can still continue to feed the desired dosing weight.
Unassigned Fences
If you want a fence to be fed by Vector, it needs to be assigned to a location. It is important to link a fence to the correct location to feed the correct ration to a fence. At the bottom of the page, you will find any unassigned fences. These fences appear here after being added to the programmed route of the Vector by Lely technical service support during a startup and cannot be removed from the Horizon interface. When a fence is removed from a location, it will appear in this list as well. By default, these fences are collapsed but can be expanded via the dropdown.
Clicking on an unassigned fence will open the fence modal, where you can set the correct settings for each fence. Ensure you select the "Automatic feeding" box to activate the fence; otherwise, it will not be fed automatically. Once completed, the fence will be correctly placed in the fence overview page.
Tip: Arrange the fences in the same order as the Vector's driving route for better visualization.