A fence is a physical area where the Vector can feed. A fence is located within a location. A location being an area in the barn where a group of animals is housed and are fed the same ration. Keep in mind that a location can have several fences but only one ration. In other words, all the fences within the same location have the same ration.
On the next picture, the dotted lines are locations. For example, milking cows (orange), dry cows (red) and young stock (yellow).
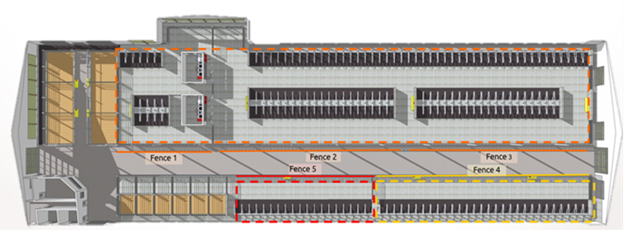
Image 1: Barn floor plan
Where can you find the Location and Fence settings?
Location settings: Manage > Farm setup > Locations
Fence settings: Manage > Feed > Fence
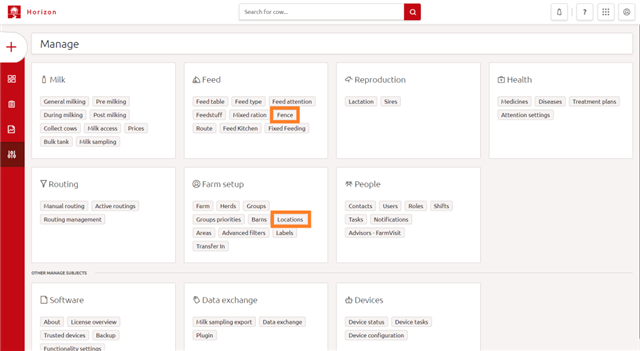
Creating new locations
The first step when you want the Vector to be able to feed is to create locations.
How do you create a new location?
Step 1: Go to the location settings: Manage > Farm setup > Locations
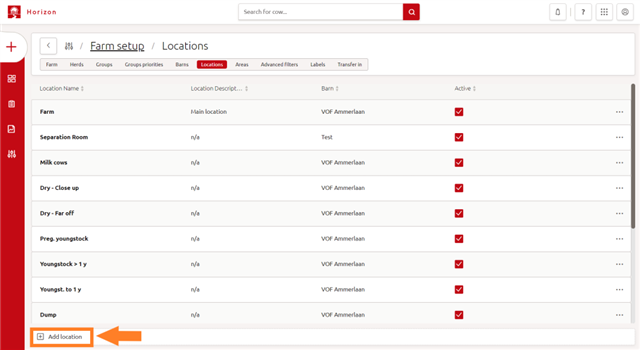
Step 2: Click on +add location OR use the + button (top left)
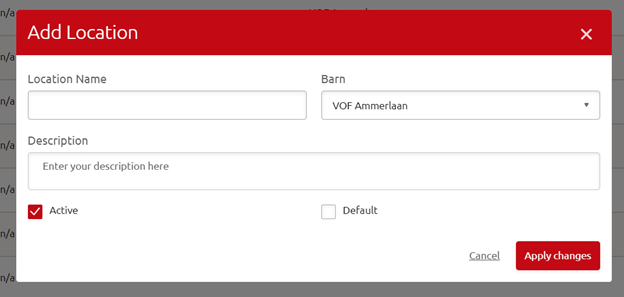
Step 3: Give the location a suitable name. (Ask your FMS advisor what the best way of naming is.) Select the barn where this location is located. You can add a description if you wish to. Make sure that the location is active if you want the Vector to automatically feed that specific location. Decide if this is the default location. A default location functions as the location where animals are assigned to when they are registered in Horizon. Only one location can be default on the farm.
To finish, click on “apply changes” and save the new location.
Step 4: Make sure the right Astronauts (and other Lely devices) are linked to the right Vector locations. Otherwise, data between Vector and Astronaut will not be shared and widgets and reports might not show the correct data. You can do this by going to Manage > Devices > Device Configuration > Astronaut. Click on the created Vector location in the drop-down menu to link the Astronaut to the right location.
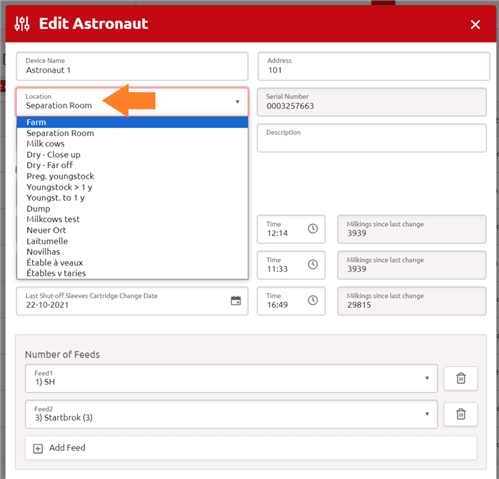
Linking Fences to Locations
If you want a fence to be fed by Vector, it needs to be assigned to a location. It is important to link a fence to the correct location in order to feed the correct ration to a fence. If a fence is in the wrong location, it will not receive the correct ration.
How do you link a location to a fence?
Step 1: Go to the fence settings: Manage > Feed > Fence
Step 2: The fences that are not assigned to a location yet can be seen on the bottom of the page, under the heading “Unassigned fences”. When a fence is removed from a location, it will appear in this list as well. (Fences are created by a service technician during the startup, when routes are programmed.)
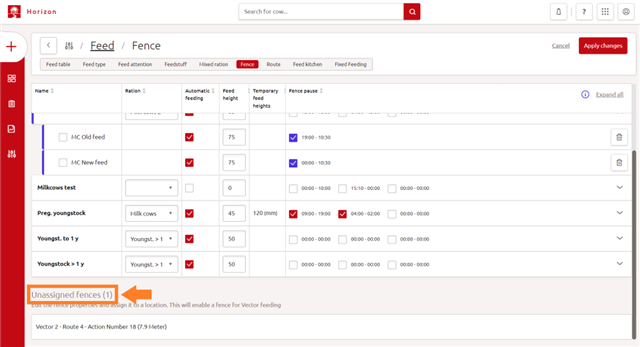
Step 3: Click on an unassigned fence. In the appearing window, a location can be chosen in the drop-down menu. You can also give the fence a fitting name. When there is only one fence per location, the fence and the location often have the same name. Make sure to select the “Automatic feeding” box to activate the fence. Otherwise, the fence will not be fed automatically!
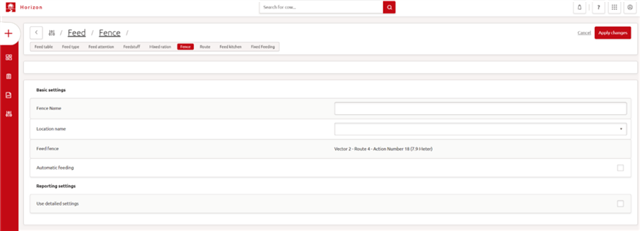
Tip! Put the fences in the same order as the Vector is driving. This will make it more visual.
Linking Fences to Routes
To make sure Vector knows which fences are where on a route, we need to link named fences to route action. This way, Vector knows data of the same fence between routes.
How to link a fence to a route?
Step 1: Go to the fence settings: Manage -> Feed -> Route
Step 2: Click on a route to open the detailed window.
Step 3: In this window you can change the route name. You can also link the fences to the route (action) number by using the drop-down menu for every action number.
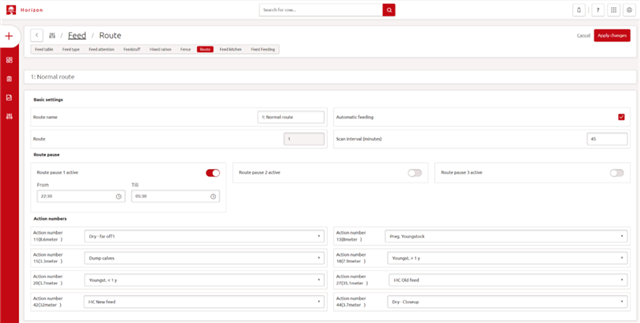
Location and Fence settings
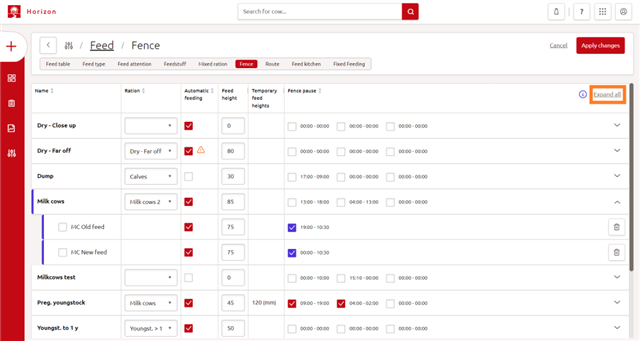
In the fence overview page (Manage > Feed > Fence), you can see the locations (written in bold), and the fences that are linked to these locations. Click on “Expand all” (top right corner) if you want to unfold all the fences within the locations. Vice versa, click on “Collapse all” if you only want to see the locations.
When the location and the fences are shown in purple, this means that different settings were chosen on fence level than on location level. This can, for example, be the case when you want a different feed height for one of the fences in a location. To do so, the “Use detailed settings” box needs to be ticked on the fence settings page. When detailed settings are used for a fence, this overrules settings on location level.
Location Settings
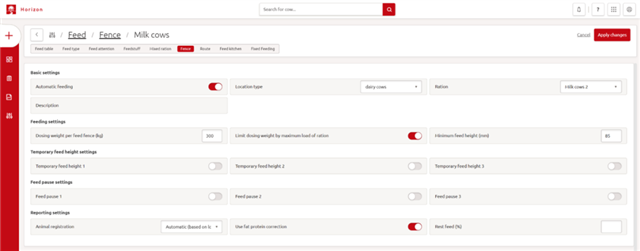
Go to the Fence overview page (Manage > Feed > Fence) and click on a location to open the location settings page. Here you can indicate the location type: dairy cows, dry cows, young stock or beef cattle and the ration you want to feed.
You can also change the feeding management settings:
Dosing weight per feed fence: This is the exact amount of feed that will be fed per fence. However, the Vector is self-learning. So, if the fence is too short or if the feed is not coming out of the bin easily, the Vector will automatically lower the dosing weight.
Limit dosing weight by maximum load of ration: The dosing weight is limited by the maximum load (= physically, how much the MFR can take with him). If this setting is turned off, and the dosing weight exceeds the maximum load, the MFR will drive a second time to reach the dosing weight. Our advice is to leave this setting on to make sure that the MFR will not drive with small amounts.
Minimum feed height: How much feed do you want there to be at least at the fence? The feed height functions as a buffer to make sure there still is enough feed available until the Vector has prepared a new batch. When feed heats up quickly, for example in summer, you may want to lower the feed height.
Temporary feed heights: You can set a different feed height for a certain period of time. This can be useful, for example, when you want to make a buffer because the Vector is out of operation for maintenance or during feed peaks.
Fence pause settings: You can turn this setting on if you do not want the Vector to feed during a certain period of time. This can be the case when, for example, the cows are grazing. Important to know that the MFR will still be driving and scanning the feed height. (If you do not want the MFR to drive at all, you need to turn on a route pause.)
Animal registration: Animals that go through the Astronaut are automatically registered. Other animals, like young stock, dry cows or beef cows, need to be registered manually. If you do not have an Astronaut, all the animals need to be registered manually. It is important to fill this in correctly to make sure reporting and analysing of data is done correctly.
Use fat protein correction: This option makes sure that on Vector reporting side, milk is corrected for fat and protein levels.
Rest feed (%): In this box you can add an (estimated) percentage of feed refusals that are left at the feed fence per day.
If you make any changes, always remember to click on the “Apply changes” button, in the top right corner to save your changes!
Fence settings
Go the Fence overview page (Manage > Feed > Fence) and click on a fence to open the fence settings page.
The settings on fence level are the same settings as on location level. (Except for “Beef table”, “Rest feed”, “Fat protein correction option” and “Type of animal registration” that are only in the location settings). Just like for the location, you can enter feed heights, dosing weights and you can add a temporary feed height or fence pause. The fence setting will overrule the location settings if detailed fence settings are used!
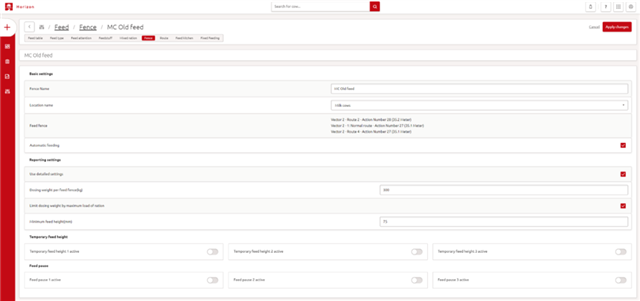
Image 11: Fence settings page
