General milking
This overview shows the general settings related to milking. The following information can be found at herd, group and individual animal level:
- Colostrum (Day)
Shows for how many days the colostrum is separated from the milk tank to the colostrum milk destination.
- Milk Destination
Shows where the consumable milk is sent.
- Separation Milk Destination
Shows where the non-consumable milk is sent.
- Colostrum Milk Destination
Shows where the colostrum milk is sent.
Sampling Method. Shows the method used for milk sampling. Sampling methods are:
1) All milkings (all milkings will be sampled)
2) 1 sample/cow (1 sample will be sampled per cow)
3) 2 samples/cow (2 samples will be sampled per cow)
4) Alternate (the 1st and 3rd milking per cow will be used for sampling)
5) Optimal (within the set sampling period, 1 or maximum 2 samples will be taken per cow. The time period can be set. Depending on the number of successful milkings, 1 or 2 samples will be taken in that time window.)
6) Note milk sampling: The last milking pre-sampling must be a successful milking. The previous milking must be 4 hours or more ago. Reset Teat Coordinates After Dry (Yes/No)
If Yes, the known teat coordinates of the previous lactation are reset. The first milking will take place without known coordinates.
- Training Period
Cows which may get concentrates but may not be milked yet by the robot can be set on a training period. This is especially meant for heifers pre-calving to get used to the robot. Dry cows have access to the robot every 8 hours. For young stock, the access is determined by the last column in the milk access table for the young stock animals.
- Optimal Sampling Period (Hour)
Milk sampling will take place during the set hours.
- Teat Positions Known (Yes/No)
When this is set to No at individual animal level, teat positions are unknown (reset) and the farmer must assist during the next milking.
Where can you find it?
Go to Manage > General milking which is part of the Milk box
Pre milking
This overview shows the settings in relation to pre-milking. The following information can be found at herd, group and individual animal level:
- Number of treatments. The number of times the brushes will clean and stimulate the teats before milking.
- Duration per treatment (sec). The number of seconds the pre-treatment takes.
We advise entering two treatments of four seconds each per treatment as standard. This will make sure that the teats are cleaned and stimulated properly before milking.
Where can you find it?
Go to Manage > Pre milking which is part of the Milk box
During milking
This overview shows the settings related to milking. We advise not adjusting these settings without consulting your Lely Farm Management Advisor. The following information can be found at herd, group and individual animal level:
Vacuum level (KPa)
The set vacuum level during milking. The Lely standard is 43 kPa.
Pulsation rate (#/min)
The set pulsation rate. The Lely standard is 60 pulsations per minute.
Milk rest ratio (%)
The set milk rest ratio. The Lely standard is 65% milk and 35% rest.
Pulsation method
The set method of pulsation. The pulsation methods available are Crossed., Left – Right, Front – Rear, In – Phase and Circular.
Take Off
The set take-off method. The methods have different minimum and maximum milk flow thresholds. Available take-off methods are:
Normal take off:
Predicted take-off level: average milk flow / 5 = take-off threshold. When below this threshold and within the minimum (50 ml/min) and maximum (400 ml/min) take-off level, the take-off delay (6 seconds) will start. The teat cup is taken off when the 6 seconds count-down are over.
Quick take-off:
Predicted take-off level: average milk flow / 3 = take-off threshold. When below this threshold and within the minimum (75 ml/min) and maximum (400 ml/min) take-off level, the take-off delay (6 seconds) will start. The teat cup is taken off when the 6 seconds count-down are over.
Extended take-off:
Predicted take-off level: average milk flow / 5 = take-off threshold. When below this threshold and within the minimum (50 ml/min) and maximum (400 ml/min) take-off level, the take-off delay (15 seconds) will start. The teat cup is taken off when the 15 seconds count-down are over.
Delayed take-off first three teats:
The take-off level of the last quarter is based on the quick take-off. The first 3 teats are based on the normal take-off settings.
Custom:
- Ability to change the take-off level and delay time to set the take-off moment more precisely. If this is set correctly, it can help increase robot capacity since the cups are taken off at the right moment and the milking does not continue unnecessarily.
- Although there are some benefits to increasing capacity, we advise only changing the take-off settings in conjunction with your Farm Management Advisor. This is because it can have a serious impact on udder health and teat condition if not set correctly.
Delayed take-off high conductivity (Yes/No)
The take-off will be delayed for cows with high conductivity.
SCC Smart Sampling MQC-C2
This setting can be set at herd and group level. It can be set to All (all milkings will be sampled), Off (no milkings will be sampled) and Smart (1 in every 3 milkings will be sampled + if a cow is suspected of high SCC, it will sample all milkings until the SCC falls).
Stimulation by pulsator (Yes/No)
Increased pulsation at the start of the milking, which can be useful for individual cows with high dead milk time (>30 seconds).
Vacuum depends on milk flow (Yes/No)
When set to Yes, this setting will try to keep the vacuum level more stable when there is an average milk flow of 2 kg/min or more.
Pulse depends on milk flow (Yes/No)
When set to ‘Yes’, the milk rest ratio adapts when there is a high milk speed detected.
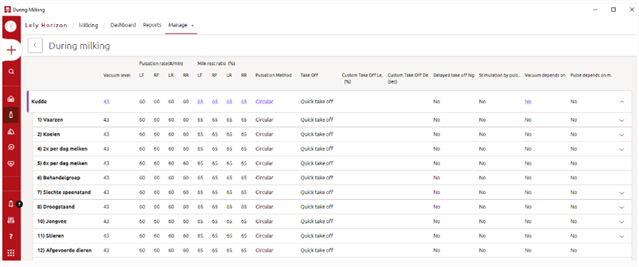
Important! Settings which can be changed in the ‘During milking’ tab can have a negative impact on cow health and the hardware if set incorrectly. It is important to discuss with your Farm Management Advisor before adjusting any settings.
Tip: If you want to know on how to increase capacity during milking, click here. More information about optimizing milk yield per milking can be found here.
Where can you find it?
Go to Manage > During milking which is part of the Milk box
Custom take off
Custom take-off is an option to increase robot capacity as milk cups are taken off at the ideal moment. With this setting, you are able to set this take-off moment more precisely. As well as improving robot capacity, it can be set at cow level to have a quicker or delayed take-off depending on the cow’s behaviour.
Custom take-off is only available with a robot software of version 6.0 or higher and in combination with the 2nd generation MQC.
Important! We advise only changing this setting in coordination with your Farm Management Support advisor from the Lely Center. If this setting is set up incorrectly, it can have negative effects on the teat condition and udder health of your herd.
Where to find this setting?
Go to Manage > During milking (part of the Milk box) > Select the current take-off method for the herd, specific group or cow
This will take you to all settings available in relation to actions during milking as well as the take-off method. The take-off method can be changed for each specific group and each specific animal. Click on the method that is currently in use in the Take Off column. This will open a new window where the take-off method can be selected.
1) Select whether to use Herd, Group, or Animal settings -> For Group and Animal settings, choose the custom take-off method from the dropdown menu
To enable the custom take-off method, you will have to choose ‘Custom take-off’ from the dropdown menu which is available in the pop-up.
2) Change the take-off level and delay time
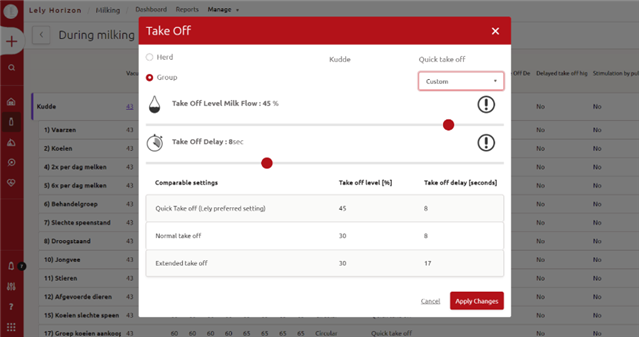
Once the Custom take-off option has been selected in the dropdown menu, additional information will appear: the Take Off Level Milk Flow and the Take Off Delay. Take Off Level Milk Flow influences when the take-off delay starts to count down. The lower this percentage, the later it will start to count down. Take Off Delay can be set to postpone the milk cup take-off per quarter once the take-off level is reached. If the milk flow increases during the count down, the take-off delay is reset.
Let’s delve into an illuminating example:
Consider a scenario where Quick Take-Off is the current setting, employing the “classic” algorithm to determine take-off level and moment. In this algorithm, take-off level is defined as Milk flow divided by 3, with a delay of 6 seconds.
Now, envision a shift to CTO. Unlike the classic algorithm, CTO utilizes a distinct approach. To maintain comparable take-off performance, specific CTO configurations align closely with the established Quick Take-Off parameters. For instance, CTO settings that correspond most effectively to Quick Take-Off are 45% of milk flow with an 8-second delay.
Let’s break down the pre-set take-off settings and their corresponding CTO adjustments:
Classic Pre-set Take-Off Settings / Algorithm:
- Quick: Milk flow / 3 & 6 sec. delay
- Normal: Milk flow / 5 & 6 sec. delay
- Extended: Milk flow / 5 & 15 sec. delay
Comparable CTO Settings to Compensate for Different Response Algorithms:
- Quick: 45% of milk flow & 8 sec. delay
- Normal: 30% of milk flow & 8 sec. delay
- Extended: 30% of milk flow & 17 sec. delay
Post milking
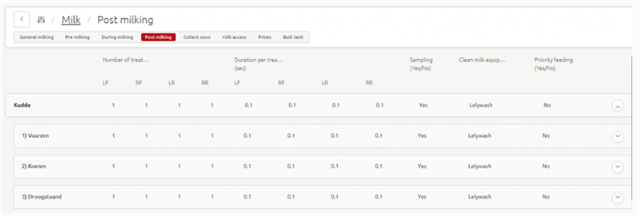
This overview shows the settings related to post milking. The following information can be found at herd, group and individual animal level:
- Number of treatments
Set the number of times the post-treatment spray is sprayed.
- Duration per treatment (sec)
Set the time per post-treatment spray.
- Sampling (Yes/No)
If ‘Yes’ is selected, milk sampling will take place for the related herd/group/individual cow.
- Clean milk equipment
The installed cleaning equipment on the robot can be selected here.
- Priority feeding (Yes/No)
If set to Yes, the cows for which this is enabled will stay within the box until all concentrates for this milking are fed. This can be enabled for cows which are unable to eat all their concentrates within a milk visit.
Please note: this setting has an impact on the robot capacity.
Where can you find it?
Go to Manage > Post milking which is part of the Milk box
Collect cows
Based on the Collect cows settings, a cow can appear on report 11 – Collect Cows. With the default settings in place, it we advise fetching the cows from the list twice a day. The criteria are based on the following:
Hours since the previous milking If the milk interval is exceeded The average milkings within a certain period of the lactation. This way cows early in lactation will appear earlier on the report than late lactating cows.
Where can you find collect cows?
Go to Manage > Collect Cows which is part of the Milk box
How do you set the criteria for collect cows?
Step 1: Define cows that are always hidden or always shown
In the Collect cows page, there is the ability to hide or show cows based on the hours since the last successful milking. Enter the hours that cows are never shown on report 11 below a certain time and the hours that cows are always shown above a certain time. The example shown in the picture means that cows with an interval under 7 hours will not appear on report 11. Cows with a milk interval of more than 14 hours will appear on report 11.
All cows in between the 7-14 hours milk interval will appear based on the settings explained below.

Step 2: Set the targets in relation to days in lactation
In order to define which cows with an interval between 7- and 14-hours appear on report 11, a minimum average number of milkings per cow per day needs to be set in relation to the lactation stage. When a cow is below that target, she will appear in report 11.
In the example below, cows up to 60 days in lactation should be milked at least 2.5 times per day. Between 60 days in lactation and 14 days before expected dry off, the minimum target is 1.6 milkings per day. The target 14 days before expected dry off is 1.4 milkings.
Example: a cow 65 days in lactation with an interval from 10 hours will appear on report 11 when her average is below 1.6 milkings. As long as her average number of milkings is above this number, she will appear on this list after 14 hours since the last successful milking.

Step 3: Set the interval exceed percentage
This setting has influence on cows between 7-14 hours milk interval (from example above), meaning cows will appear based on the target for the minimum number of milkings per day. When a cow is above this set percentage, she will appear on report 11.
Example: a cow which may be milked 4 times per day (according to the milk access table) has an interval exceed percentage of 100% after 6 hours (24 hours/4 = 6 hours). If the interval exceed percentage is set to 200%, this cow will appear on report 11 after 12 hours.

Note: bear in mind that all cows on the collect cows report will have milk access and will always be milked by the milking robot.
Pre-treatment optimizer
Lely’s goal is to achieve complete, quick and gentle milking for each individual cow. Every cow is different and has changing needs during their lactation. To reach this goal, delayed milk ejection needs to be reduced and the pre-treatment optimizer supports achievement of this goal. The aim of the pre-treatment optimizer (also called PTO) is to reduce delayed milk ejection without compromising robot capacity, cow comfort or udder health.
Preparation is essential to have successful milking. Lely Brushes clean and stimulate the teats before milking. The pre-treatment optimizer determines how many times and for how long teats are brushed for each individual cow.
The aim of PTO
The aim of PTO is to create a unique pre-treatment experience and reduce delayed milk ejection (bimodality) without compromising robot capacity, cow comfort or udder health. Preparation is essential to have a successful and complete milking.
What is bimodality?
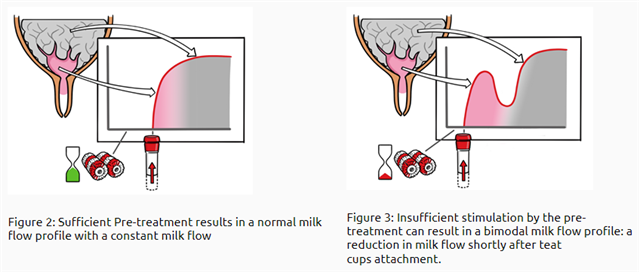
Within each quarter of the udder is a cistern (reservoir) and an alveolus (milk gland); both contain milk. The milk from the cistern is immediately available. The milk from the alveoli (milk cells) is released upon contracture of the alveolar muscle when the hormone oxytocin reaches the udder through the blood supply. The pituitary gland secretes oxytocin into the bloodstream following a nervous system stimulation when the cow wants to be milked. If the cistern is empty before the milk from the alveoli letdown, a drop in milk flow will appear. Bimodality is this drop in yield.
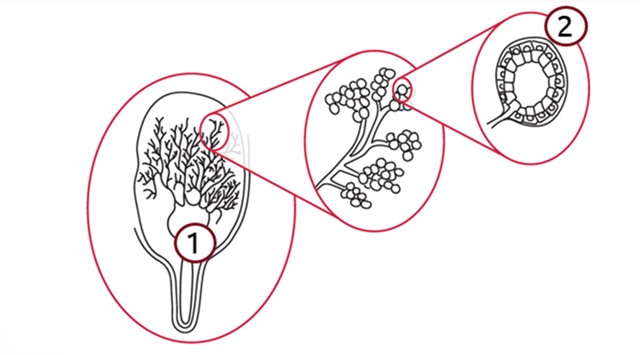
Figure 1: The udder of a cow with the udder cistern (1) and the alveoli (2)
Bimodality can occur when the teats are not stimulated enough. Milk flow starts high during the emptying of the udder cistern. Then, milk flow drops because the alveoli did not yet release enough milk to meet the teat milk flow capacity. Milk flow will increases again once letdown is complete. The teats need to be stimulated for the cow to release oxytocin, and the udder’s alveoli need time to respond by releasing milk. The required stimulation time is different for individual cows.
Oxytocin
Brushing does not only clean the teats; it also stimulates the cow into knowing she is about to be milked. This results in the secretion of the hormone oxytocin from the pituitary gland below the brain into the bloodstream. Oxytocin is responsible for the release of milk from the alveoli by causing the muscle tissue around each alveolus to contract. The time between the start of the stimulation and milk letdown from the alveoli is typically between 60 and 90 seconds. Taking the time requirement into account is essential for successful continuous milk flow during milking.
The importance of preventing bimodality
During the dip in milk flow (i.e., bimodality), the teats are exposed to system vacuum (43 kPa) resulting in the disturbed accumulation of blood and swollen teats. This accumulation causes immediate discomfort for the cow and a longer cups-on time due to restricted milk flow during the rest of the milking. An unpleasant milking experience for the cow will result in few visit attempts and a delayed response to pre-treatment stimulation on subsequent milkings. If bimodal milkings become a chronic occurrence, permanent teat damage, keratinization of the teat end sphincter may occur. Taking time for stimulation at the beginning of the milking results in a complete milking with a shorter cups-on time.
What can you expect from PTO?
PTO is a self-learning model. With the help of the milkflow profiles, PTO optimizes brushing settings. The model constantly analyses milkflow profiles. It takes time for the model to learn the cow’s milkflow profile. After switching to PTO, it takes 3 or 4 days before the influence of PTO is visible.
- Bimodality cows on test farms reduced by 15% in 60 days after starting with PTO.
- Pre-treatment time will increase.
- Milk speed will increase. Because of better pretreatment time, oxytocin works optimally to release milk out of the udder.
- Milking time (cups-on time) will decrease.
- No big fluctuations in box time
- Udder health will improve (Ingalls, 2001).
Which cows are optimized?
All cows with more than 5% bimodality in the past week have their brush settings optimized.
Exceptions:
- Where robot free time is below 5% (on farm level), new cows entering the herd will not be optimized.
- Cows with mastitis will not be optimized.
- Cows with frequently failed milkings (50%) will not be optimized.
- Cows that have already been stimulated for more than 130 seconds.
- Cows on manual settings will not receive new brushing settings from PTO.
Continuous updating of pretreatment settings occurs when the Horizon computer has an Internet connection. If the connection is lost, the most recent settings are used.
Brushing time
The advised pre-treatment time is 2×3 seconds for Astronaut A4 and 2×4 seconds for Astronaut A5. A longer brushing/stimulation time on the A5 is required because of faster attachment times. For using USA pretreatment 2×2 or 2×3 is advised.
The maximum brushing time that can be assigned by the pre-treatment optimizer is 3×6 seconds.
Turning PTO on/off
PTO Activation Not all farms can activate PTO, it is possible where there is a banner at the top or if you are allowed to turn it on via the Pre-milking page.

When you activate PTO, you will be guided through an onboarding flow with information regarding PTO and you need to enter the minimum brushing settings (minimum amount of treatments & minimum duration per treatment). It is important that the current brushing settings (pre-treatment time) do not differ too much from the new PTO minimum settings. The advised pre-treatment time is 2×3 seconds for Astronaut A4 and 2×4 seconds for Astronaut A5
Deactivation PTO
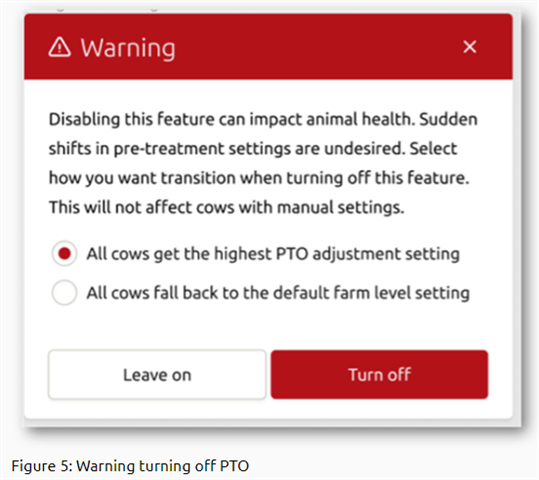
It can happen that a farmer wants to turn off PTO. This is possible via the general milking page.
A confirmation pop-up appears with two options:
1. “Adjust all cows to highest settings. This gives the lowest bimodality on your herd, but might come at the cost of boxtime.”
2. “Adjust all cows to the default settings. This might come with the risk of bimodality, but is less likely to come at the cost of boxtime.’’
Work with PTO in Horizon
In Horizon you can monitor your PTO settings and analyse the PTO performance.
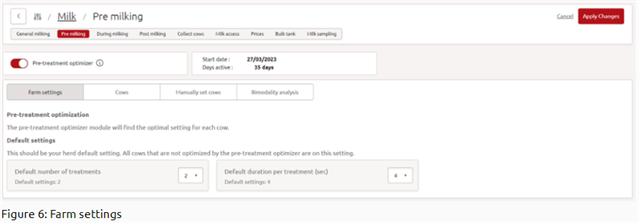
Farm settings
On this page, you can turn PTO on or off and see when PTO is activated. Further, the default setting is shown and you are able to change this part.
Cows
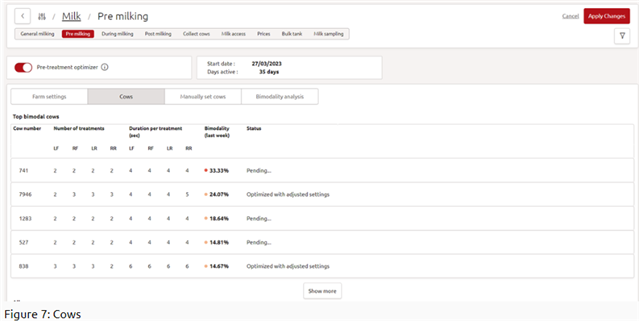
Under the tab “cow”, the top 10 bimodal cows are shown and, below the top 10, all cows are shown with their current settings per teat (left front, right front, left rear, and right rear, in that order). Next to the pre-treatment setting, bimodality per cow in the last week is shown.
What it means if a cow has 24% bimodality:
A cow is milked 1 week x 3 milkings / day = 21 milkings. For every quarter, we measure milk flow profiles, so that means in total for this cow 21 milkings x 4 quarters = 84 Milk Flow Profiles. Every milk profile is checked; in this case, 20 milk flow profiles are bimodal and 64 milk flow profiles are not bimodal. This cow is 24% bimodal; 20 / 84 = 24% bimodal.
The cow tab gives the status per cow, with information on what PTO is currently doing.
- Pending: if none of the other messages apply
- Optimized with adjust settings: If the PTO flag is set and the setting of any teat is higher than the default
- Optimized with default settings: If the setting is set by PTO, but is equal to the default on all teats
- On manual settings: Cow is on manual settings
- Not enough eligible teats: Cow has 2 or more disallowed teats.
Manual set cows
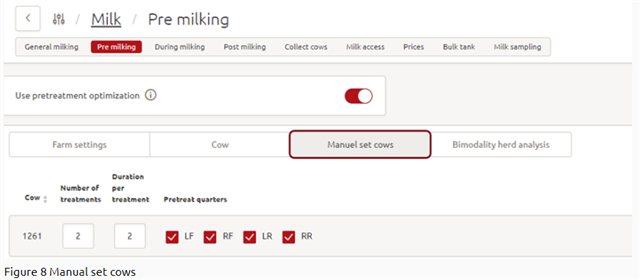
The tab “manual set cows” shows all cows on manual pre-treatment settings. To put a cow on manual setting, go to: cowcard > + button > milk settings. Here you can change a cow to manual settings. After the manual setting is turned on, the cow will be visible in the list of manual set cows. To reverse this process and allow the cow to be put back into optimization by PTO, follow the same steps. However, set the milk settings to “automatic settings” instead of manual.
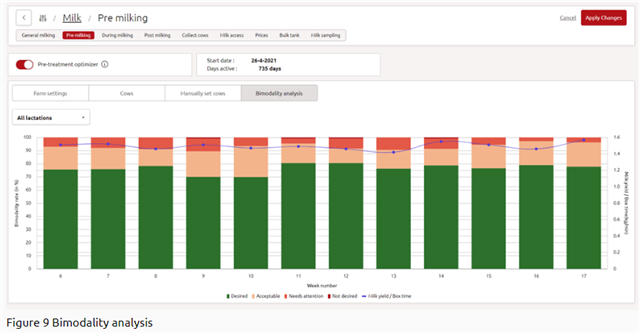
Bimodality herd analysis
The tab “bimodality analysis” shows the bimodality development of the past weeks in a graph. This graph shows the influence of PTO. On the button “Filters” you can filter the cows on lactation (1, 2, 3+ and all lactations). The graph shows the percentage of bimodal categories (see index) per week and milk yield/boxtime. A line or bar can be hidden by pressing the name in the legend below the figure. The green bar shows the percentage of cows in the herd that are Desired (0-10 %). The light orange bar show the percentage of cows that are acceptable (10-25 %). The orange bar shows the cows that are 25-50 % bimodal and the red bar shows the cows that are the most bimodal (50-100%).
Blue line: milk yield/boxtime (kg/min) averaged for all cows.
If you have any questions about the pre-treatment optimizer, please consult your Lely Farm Management advisor.
Milk access
The Lely Way is to apply Free Cow Traffic, although this does not mean cows will be milked every time they visit the Astronaut milking robot. There are numerous reasons why you might want to limit milkings, including milk quantity and quality. If some cows monopolise milking robots and other cows are not milked often enough, their production will be limited by udder capacity. If cows are milked too often, teats may be damaged which will increase their chances of getting mastitis. The milk components are also negatively affected by too frequent milkings. To help prevent these issues, Lely uses the Milk Access Table. This table sets the parameters in order for Horizon to determine whether a cow is allowed to be milked.
Days in lactation and expected milk yield per milking are considered to determine whether a cow should have access to be milked. The Milk Access Table has settings for the maximum and minimum number of milkings per day and the optimum milk yield per milking. A cow will be milked based on her optimum milk yield per milking, but not more often than the maximum milkings per day setting with guaranteed access based on a minimum milkings per day setting.
How do you set the Milk Access Table?
We recommend the optimum yield per milking day should be between 8 and 12 kg. This allows the cow to produce milk without experiencing stress on the udder and there is no negative impact on milk quality.
The Milk Access Table is divided in three parts based on lactation stage: early lactation, mid lactation and late lactation.

1) Early lactation: a cow in early lactation is preparing to produce a large amount of milk per day depending on the breed and environment. This means a cow in early lactation needs to be milked more frequently than a cow in late lactation to avoid limiting milk production potential due to udder fill.
2) Mid lactation: a cow in mid lactation needs an incentive to maintain milk production as long as possible. By adjusting the settings, a balance can be found between giving more access to higher producing cows and adequate access to lower producing cows.
3) Late lactation: a cow in late lactation will have a significant lower milk production and therefore needs fewer milkings per day. Lowering the number of milkings per day prepares her for a successful dry off with reduced likelihood of inflammation.
It is possible to make a Milk Access Table for a group. To monitor the results of the milk access settings, check the Milking -Visit behaviour report. This provides an overview of the outcome of the milk access settings on individual cows.
Example: a cow has an average milk yield of 34 kg (75 lbs) at 60 days in lactation. Based on her days in lactation, she fits in column 2. Her optimal milk yield is 10 kg (20 lbs) per milking. Divide the yield by the optimum expected yield (34/10): she can be milked 3.4 times per day. This falls within the set maximum number of milkings (5 milkings per day).
Remember:
- Setting a Milk Access Table influences milk production, robot capacity and cow health
- Adjusting a Milk Access Table should always be done in small steps (<0.5 kg/week)
- Always keep monitoring what is happening
- If you are not sure, please consult your local Farm Management Support Advisor
Prices
Entering prices is relevant, especially when you want to make good use of your margin per cow.
How to enter prices in Horizon?
Currently, it is possible to enter milk and feed prices in Horizon. If your farm has a Vector, the roughage price calculation will be based on the calculated ratio. If only an Astronaut is used, ask your FMS advisor to provide you with the roughage price calculation tool.
Astronaut only
Step 1: Go to Manage > Milk > Prices > Add milk price
Enter the information and click on Apply changes.
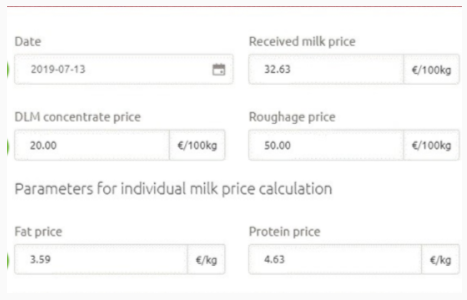
The received milk price includes surcharges.
Only enter the DLM concentrate price if the DLM feeding module is enabled.
To calculate the roughage price, your FMS advisor can provide you with a tool.
Step 2: Go to Manage > Feed > Feedstuff and click on the […] in the row of the feedstuff to enter the dry matter content and prices for the concentrate fed in the robot and Cosmix. Click on Apply changes to save the data.

Astronaut & Vector
Step 1: Go to Manage > Milk > Prices > Add milk price
Enter the information and click on Apply changes.
The received milk price includes surcharges.
Only enter the DLM concentrate price if you have enabled the DLM feeding module.
Step 2: Go to Manage > Feed > Feedstuff and click on the […] in the row of the feedstuff to enter the dry matter content and prices for the feedstuffs fed. Click on Apply changes to save the data.
Fat protein calibration
Timely calibration will result in accurate fat and protein measurements from the robot. We advise calibrating the sensors every month.
How do you calibrate the fat and protein sensor?
The fat and protein sensor can be calibrated in two ways:
1) Bulk tank entry
- all robots are calculated based on the whole herd
2) Cow individual milk sample results
- this calibration is based on individual cow results, per robot, based on the cows that have visited that robot.
For a herd with predominantly one breed, bulk tank and individual milk sample results calibration will have the same accuracy. Only in the case of a mixed herd, and where each breed is assigned their own robot(s), will individual milk sample calibration result in increased accuracy compared to bulk tank entry.
Bulk tank entry
Go to Manage > Milk > Bulk Tank > Select the bulk tank for which you want to enter data
The entry fields are shown. For good calibration, the entry fields for fat and protein are mandatory. The SCC, FFA and lactose are voluntary. Enter the correct values in the overview.
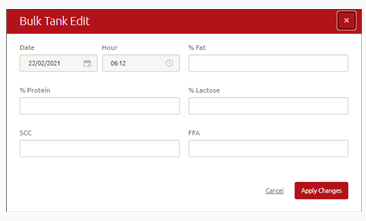
In the lower right-hand corner of the screen, click Apply changes to save the entered data.
Milk separation
To make sure milk is guided towards the correct destination, for example, to separate colostrum / milk for the calves and to ensure that antibiotics do not end up in the bulk tank.
Important work routine!
- When entering a milk separation in combination with a treatment, always enter the milk separation with the treatment in Horizon before treating the cow.
- Always be sure that if a milk separation is done after treatment, milk separation settings are completely confirmed (see step 4).
- To be sure that antibiotic milk is separated from milk in the bulk tank, ensure that you use treatment plans linked to milk separation and that all medication is entered into the Medicines overview in Horizon, and check the proper waiting time for milk is entered in hours!
- Keep in mind that the milk separation period in Horizon has an extra “safety separation”, as there is always one extra milk separation (counts for colostrum, manual and health treatments).
How do you register a milk separation?
A milk separation can be registered in two ways:
1) An individual cow
2) Multiple cows
1. Individual cow
Step 1: Select the cow to register a milk separation by:
Going to the cow card; Selecting the cow in a task, or Selecting the cow on a report.
Step 2: Click + -> Milk separation
Step 3: A new window opens where you can:
Create a new milk separation
Step 1: Select the start date
Step 2: Select the end date
Step 3: Choose the correct separation destination from the dropdown menu.
Change the settings if there is already an existing milk separation. You can end the separation by selecting the End now box.
Step 4: Click ‘Apply changes’to save your changes. A confirmation screen appears for the milk separation once all three actions are confirmed (Created, Send, and Confirm).
Note: if milk separation is not confirmed, do NOT milk the cow; contact your Lely Center first.
2. Multiple cows
With this option, it’s only possible to complete a milk separation batch entry if all the selected cows need to have the same separation destination.
Step 1: Select the cows to register a milk separation by:
1) Selecting the cows in a task or
2) Selecting the cows on a report.
Step 2: Click + > Milk separation
Step 3: A new window opens where you can create a new separation destination for the selected cows. Here you:
- Select the start date
- Select the end date
- Choose the correct separation destination from the dropdown menu.
Step 4: Click Apply changes to save the changes you have made for all cows. A confirmation screen appears for the milk separation once all three actions are confirmed (Created, Send, and Confirm).
Note: if milk separation is not confirmed, do NOT milk the cow; contact your Lely Center first.
Abbreviations for milk separation
Milk separations can be done via the Management Information System (MIS) (meaning Lely Horizon) or Robot Information System (RIS) (meaning the Astronaut), which is related to physical obstacles of the milking system, e.g. a dirty milk glass. These abbreviations can be shown in the column “Milk Destination Reason”. If “NoReason” is shown, the last milking is shown where the milk was sent to the latest destination, and the status of the milk separation has not been confirmed (check milk separation status).
Milk separation KPI versus Milk separation task/report
- The milk separation task/report shows which cows have planned separations (due to a treatment for example). This task can be used to check cows that have an active milk separation, or it can be used to end milk separations.
- The KPI shows all separated cows in the past 24 hours (cows are only counted if they entered the robot during the last 24 hours and all milk separations are counted, even those that were not planned). This means that the milk separation KPI includes, separated milk from health treatments, manual milk separations via Horizon, and automatic milk separation from the robot when activated (milk colour (blood milk, watery), high conductivity) or blank milk destinations (automatic robot stop or other).
Entering historical or future health treatments
Editing historical data relating to health treatments can have a big impact on any related actions. To prevent unwanted consequences, there are several rules in Horizon for the historical editing of health treatments or for adding future health treatments.
From a farmer’s point of view, you want to be able to edit/delete any health treatment action but get a warning and stop if this affects a milk separation. In this way, you are more flexible, and you can maintain your medicine registration.
From a Lely perspective we want to protect the farmer from accidently deleting/shortening the milk separations.
Some ground rules for adding or editing historic or future health treatments in Horizon:
- Adding future health treatments with milk withholds are not possible
- Editing historic health treatments with milk withhold via batch entry is not possible
Set 3 teat cow
To exclude one or more teats from every milking.
How do you register a 3-teat cow?
Step 1: Select the cow for which you want to change the milk settings by:
1) Going to the cow card;
2) Selecting the cow in a task, or
3) Selecting the cow on a report.
Step 2: Click + > Milk settings
Step 3: A new window opens where you can change the individual milk settings for the cow:
- Deselect the quarter(s) you do not want to milk.
Step 4: Click Apply changes to save the changes you have made
Cell count & smart sampling
To optimise udder health management, it is important to have a good insight into the udder health performance on farm. With the help of the Lely sensor technology for monitoring the udder health cell count, it is now possible to view cell count values and monitor them per cow in a cost effective and smart way.
To retrieve information on udder health, frequent sampling is needed. With the help of this frequent sampling, a complete cell count pattern can be created. This is why Lely is introducing Smart Sampling. Compared with sampling all milkings, cost savings of 50% on average might be expected thanks to Smart Sampling.
How does it work?
- Every 3rd milking is automatically sampled
- If a cow is suspicious, the following 3 consecutive milkings will also be sampled
How do you activate smart sampling?
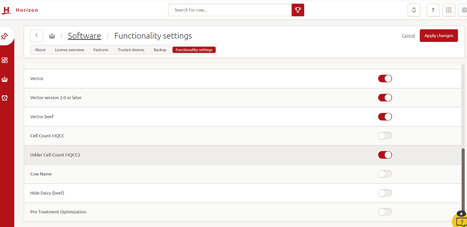
Step 1: Click on Manage > Software > Functionality settings > select udder cell count MQCC2
Activating the functionality setting for Smart Sampling
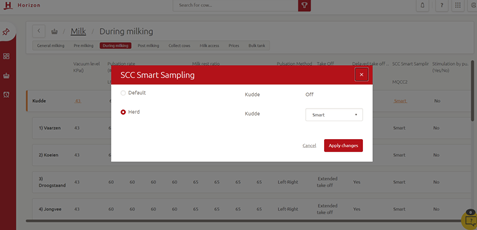
Step 2: Click on Manage > Milk > During milking > set sampling method to Smart
Activate the option for Smart Sampling via the milking settings (during milking, it can be set at herd and group level)
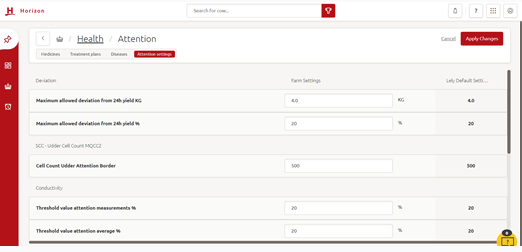
Step 3: Click on Manage > Health > Attention settings > check/set SCC attention threshold
Set the attention threshold for reporting (range 200 – 1,000). Attention threshold is at herd level
How do you monitor or find SCC values within Horizon?
You can find more information in the following reports:
Report 12 – Udder Health Work List
The ‘Impact of Cell Count on herd’ column shows to what percentage this cow contributes to the total herd cell count.
Milking Udder Health Work list (SCC indication is based on geometric mean [excluding outliers])
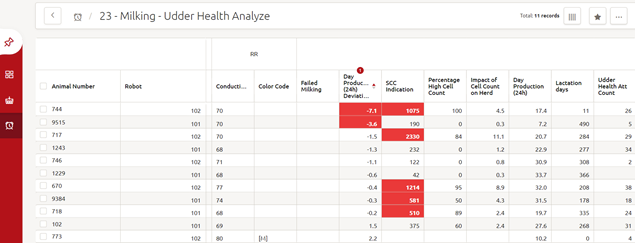
Report 23 – Udder Health Analyse
The Percentage high cell count column shows the percentage of milkings within the last 14 days with an attention for SCC.
In the Cow actual template, there is also the ‘SCC Chronic attention’ column; this flag will be triggered if 30% of the milkings in the last 14 days have an attention.
Milking Udder Health Analyse (SCC indication is based on geometric mean [excluding outliers])
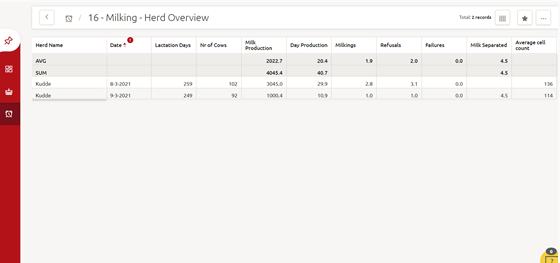
Report 16 – Milking Herd Overview
The Average Cell Count column shows the cell count for the herd
Monitoring: Cow Card Milk Quality – SCC Pattern
Search for a cow > Milk > Milk Quality > Choose graph view
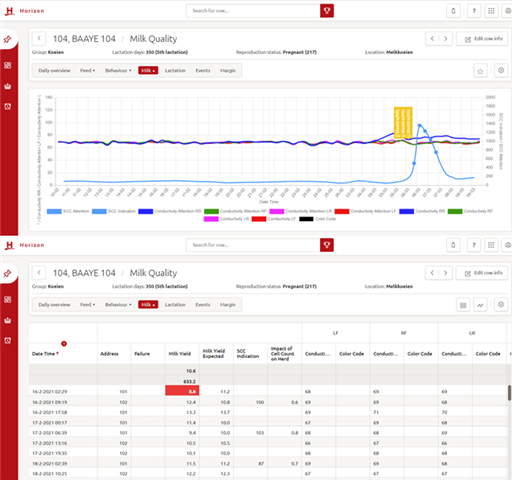
A unique udder health management tool
It is known that the cell count can fluctuate over time. In order to make the right management decisions, the cow card provides a clear SCC overview. Patterns can be distinguished right away.
Check:
- Milk quality graph: SCC pattern
- Percentage high cell count’: % of milkings within the last 14 days with an attention for SCC
- Cell count classification: values are shown e.g. 200, 250 (x 1,000)
- Impact of the cell count on the herd: % a cow contributes to the total herd cell count
- Average cell count: Average cell count for the herd
- Act & improve
- Treatment of high cell count
- Preventive dry off with antibiotic yes/no
- Keep track on cows that contribute the most to herd SCC (sampled animals)
Reduce failed milkings
A failed milking is an incomplete milking and a potential risk for a cow. As a result, failed milkings should be avoided wherever possible.
Just five failures per day costs around 40 minutes in lost productivity per robot. On average, this is equivalent to a drop in milk production of 60 kg milk. In the following steps, we will explain where to focus your attention within Horizon.
Step 1: Check overview 14 – Failed milkings last 24 hours on a daily basis
Select an animal and/or robot number. Check if the same cows appear repeatedly and if one robot is more prevalent than others.
Step 2: Determine the reason for the failure by analysing the visit result, and take appropriate action
Possible actions at cow level:
- Consider less frequent milking or drying off of cows with too low production by increasing the optimum milk yield for cows in last phase of lactation (milk access table).
- Consider milking cows with crossed/close teats less frequently (e.g. 2 x per day) by adding a special group with different milk access settings (more milk in the udder results in better ‘standing’ teats).
- Consider making 3-teat in case milk time <1 minute on certain quarters.
TIP! cows with a failed milking have continuous access to the milking robot; these cows are shown on the collect cows report OR on report 13 Failed Milkings. Make sure those cows have a successful milking to avoid them having repetitive failures due to continuous milk access.
Increase capacity during milking
Reducing the milk time of a visit to the milking robot while optimising the milk flow can increase robot capacity. 30 minutes of capacity can be gained by reducing the milking time by just 10 seconds.
Optimise milk time
Check Report 56 – Robot Performance and compare the milk time per quarter. It is normal that milk times between front and rear quarters are different, but the milk time differences are typically less than 10 seconds between both front or rear quarters. Having more than a 20 seconds difference should be avoided and be investigated as soon as possible. Keeping the difference under 10 seconds can save half an hour capacity per day (reduction 10 seconds per milking x 180 milkings = 30 min).
TIP: if the difference is over 20 seconds, a dashboard attention will be shown.
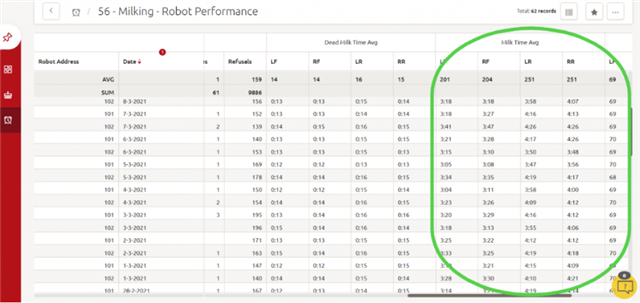
When a dashboard attention occurs, the following points need to be checked:
- Is the air bleed hole in the bottom teat cup shell open and clean?
- No leaking or restricted tubes (twin/pulsation/milk tubes)
- No twisted liners in the teat cup shell (effecting liner opening/closing)
- No split liner
- No cracks in the liner head (losing vacuum or causing liner slip)
- Avoid any moist or dirt in the pulsator, pulsation lines or vacuum nipples to the pulsator
Optimize milk yield per milking
Are your cows milked at their optimum yield per milking? Increase milk quality and robot capacity by milking your cows at their optimum milk yield per milking. Optimising the yield per milking can increase capacity by up to 60 minutes*.
Step 1: Milking cows at the right moment
The milking moment is influenced by the milk access table. To investigate if this is correctly, check Visit Behaviour report 35 and check the Average Yield per Milking per cow. Lely Farm Management Support advises 8 kg (17.6 lb) – 12 kg (26.4 lb) milk per milking depending on the herd production. Using the Average Yield per Milking parameter to sort report 35 makes it easy to identify if certain cows are milked too often.
TIP! As a rule of thumb, the average herd production can be divided by 3, with a minimum of 8 kg (17.6 lb).
Step 2: Evaluate the individual situation
Often, when cows are producing less than the optimum yield per milking:
- they either have too much milk access or
- the milk production is rather low
Step 3: Optimize milking yield per milking
- Find reasons why cows are not being milked at their optimum yield
- Adjust the milk access table to requested situation
- Optimize the optimum yield per milking in small steps
- Reduce minimum or maximum number of milkings set
- Different milk access tables might be necessary for heifers and cows due to the difference in production
Example: optimized milk access table for 27 kg (59 lb) producing herd:
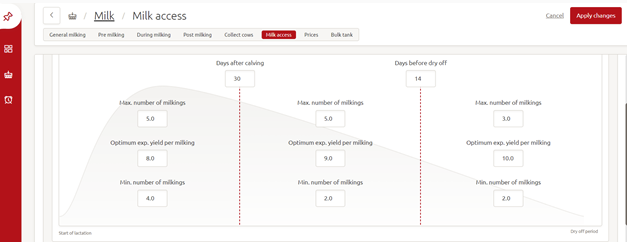
More about milk access
Learn more about the workings of the milk access table in the chapter on Milk Access or contact your local Farm Management Support advisor.
Also read another tip related to increasing the capacity in the chapter Reduce failed milkings:
*60 minutes time saving is a result of optimising the milk yield. Increasing the average milk yield from 8 kg (17.6 lb) to 10 kg (22 lb) has the potential to reduce the total number of milkings by >20%. The real-time savings are a 20% drop in pre & post treatment times (2:00 min) which corresponds to approximately 60 minutes overall per robot.
SOP's Milk Quality for Canada
Standard Operation Protocols for Milk Quality. By clicking on the link the pdf can be downloaded and/or printed
Standard Operating Procedures (SOP’s)
English
French
Records
English
French
