Tasks widget
The best way of managing a farm has changed over the years. What we also see is that farm structure is changing: over the last few years, herd size has increased, and farmers are finding other ways of doing their work. As a result, an increasing number of dairy farms depend on hired (non-family) labor. Regular professional communication and establishment of farm-specific protocols are essential to help minimise human error and ensure consistency of practices. This is why Horizon uses tasks.
TIP! The tasks can be fully personalised for each shift; this can be done in the manage page: Task Management and Shift Management. For more general information about dashboard widgets, click here.
How do you use your tasks on the dashboard?
Step 1: Start on the dashboard -> click on Add a widget
Step 2: Choose the widget type Tasks.
Step 3: Choose if you want to have the widget on the left side bar or in the main dashboard.
Step 4: Click on Apply changes to save the changes you made
How do you change your view for tasks on the dashboard?
Step 1: On the dashboard, click on the three dots in the task
Step 2: Choose Change view
Step 3: The view can be changed between block view and list view. List view is more compact, and block view is easier to use on phone.
TIP! Colours help show the current status of the task
No colour: task without colour; not yet started
Green: task is completed
Yellow: you have a task with some advice
Blue: you have an ongoing task
Hoof trimming task
Keeping track of hoof trimming is crucial to prevent lameness and to ensure health and productivity. The hoof trimming task is a default task that helps keeping track of all cows that require hoof trimming (during a specific shift/time). This task is set-up with a default advanced filter, to make sure the cows that require hoof trimming appear on the hoof trimming task.
The cow’s that will appear on the task are:
- 100 days in milk preventive hoof trimming
- Before dry off preventive hoof trimming
- Cows with a reminder for hoof trimming
Where to find the hooftrimming task:
Add the task: Dashboard > + button > Add task > set hoof trimming task
When added already: Dashboard > Widget “Tasks” > Hoof trimming
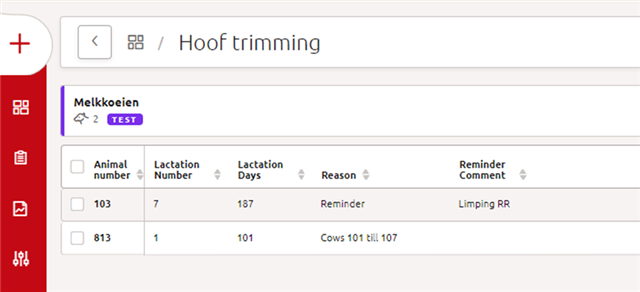
Figure 1: The hoof trimming task
How to set a reminder for a lame cow:
When a lame cow is spotted, a reminder can be set to check if the cow needs hoof trimming.
Cowcard > + Button > Reminder > click hoof trimming and other requirements you wish to add > The cow will appear on the hoof trimming task.
Three dots:
The three dots can be used to add a health treatment action/entry or a cow routing.
Create new task
A task is an assigned piece of work. Working with tasks makes working clearer and easier.
How do you create a new task?
Step 1: Go to Manage > People > Task management > + > Task
Step 2: A new window opens where you can enter:
Which cows you want to show on the task; A name for the task; Which shift the task must be done in; The schedule: which days the task must be done; How to sort the item, and In which direction the item is shown.
Step 3: Below this, you can choose:
If you want to repeat the schedule for the different days; if not, enter the number of weeks you want the task to be done. If the task must be shown in groups by location (yes/no). If you want to route the cows on this task.
Step 4: Click Apply changes to save the changes you have made.
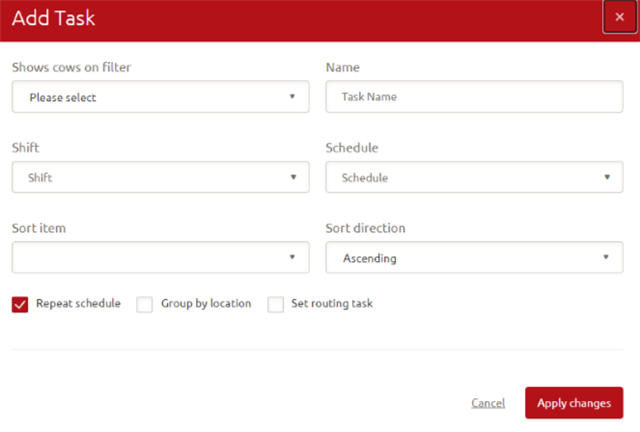
Custom tasks
With the function custom tasks, it will be possible to create a custom task out of a report or based on a default task. Therefore, it will be possible to create tasks more fit to this particular farm. With the help of advanced filters, you can create custom tasks to optimize the daily- or weekly workflow on the farm because it’s based on your specific situation.
How to create a new custom task via the + button or the task page?
If you want to create a new custom task based on a default task, meaning it uses the same filters as the default task, but you can adjust the information shown in a task, it’s possible via the + button on the dashboard or via the + button on the manage page > people > tasks
Step 1: Go to the + button on the dashboard or manage page; tasks and click add task.
Step 2: A pop-up screen appears with the first creation step. Select the option custom task.
After selecting custom task, you can select and add following information/options:
> Select the task template you want to use. The task templates are based on the existing default tasks.
> A proposal for the task name is already filled in, however this can be adjusted to your own liking.
> Advanced options; group by location. Click on the “I” button if you need more information about this option.
Step 3: Click on the button Next.
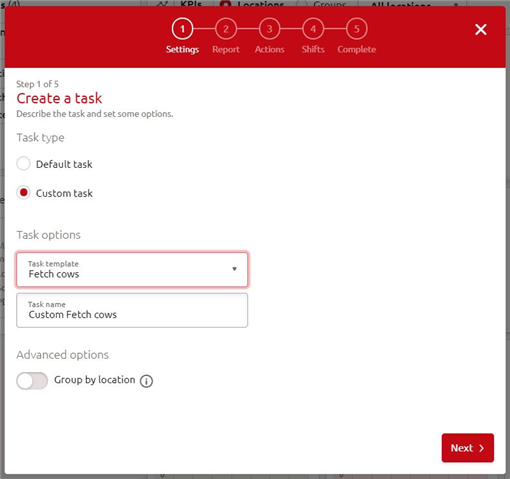
Custom task creation; step 1
Step 4: The next screen appears where you can select following:
Columns: select the most relevant columns you want to see in the task (max. 15). By default the columns from the default tasks are selected.
> When you want to add new columns click on the add columns in the right upper corner.
> You can drag and drop the columns with the arrows to the right to change the order of showing in the task.
> Hit the checkbox to select the column or deselect a column.
> Please note 15 columns are shown in the task on the desktop, the first 10 columns are shown on the mobile app.
Sorting: Here you can choose your way of sorting. Select the column you want to sort by. Then select if you want it ascending or descending.
Filters: Here you can set the filters for the selection of cows for this task. This can be done by basic filters or advanced filters (the advanced filters must be created up front). It’s possible to add extra properties for the basic filter when needed to make the tasks more personalized. If the advanced filter needs adjustment, the original filter needs to be edited via the management page > farm setup > advanced filters (see the help document Advanced filters for more information).
With the Basic filters, it possible to select the criteria type:
Hard criteria: When you select this one the tasks must meet these criteria for selecting the cows. If more than one criteria is used and Hard is not marked, the tasks generator will show all animals that meet the criteria (or/or). If hard is marked, it will only show animals that meet that specific criteria (it is ‘and’ and not or/or).
Ask: When you mark this box, a popup box will appear when opening the task to set the details, like how many days of data it should show.
Without: If this option is selected, the cows that meet this criteria must excluded from the task.
Step 5: When you added and edited the task information and settings to your liking, click next.
Step 6: Select the actions you want to connect to this task, like Routing. You can select the main action and two additional actions which are mostly used during the performance of this task.
Step 7: When you selected all actions click on Next.
Step 8: Select in which shifts this task should appear, and on which days in the week. When this should be repeated check if the button repeat schedule is turned on.
Step 9: When you selected the right shifts and days, click on next.
Step 10: Check if all the information and settings are correct. Are they correct click on Complete.
When something isn’t correct, please go back to the right page by clicking the Previous button.
When the task is created successfully a green bar in the top of the screen appears with the message; task is created successfully. The task will appear in the task widget and the task overview in the corresponding shifts/days.
How to create a task based on a report?
Before you start: Create the report if needed. Please see the help document about Advanced filters and reports.
Note: Only a report based on a cow-actual template can be converted into a task; meaning only actual data can be used for a task. If you want to see data that goes further back reports are used for analyzing.
If a report is based on the cow-actual template can be seen via the edit button; the kind of template used is shown in the pop-up appearing.
Step 1: Go to the report that you want to convert to a task.
Step 2: Click on the three dots in the right corner. A list appears and then click on convert to task.
Step 3: A new screen appears where you can enter/change following:
> Name: Check if the task has the correct name. If not, change it.
> Options: Here you can turn on the option: Group by location. Click on the ‘I’ button if you need more information.
Step 4: Click on the button Next
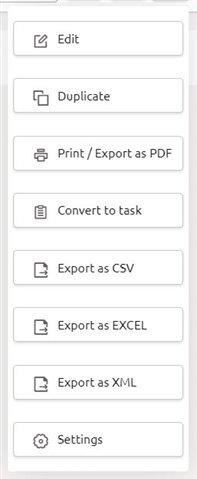
Report options; convert to task
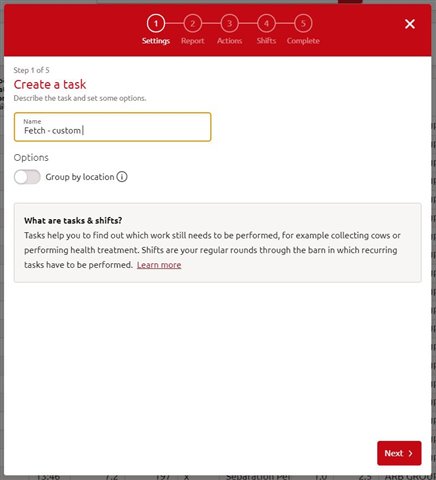
Create a custom tasks; step 1
Step 5: The next screen appears where you can select following:
Columns: select the most relevant columns you want to see in the task (max. 10).
> When you want to add new columns click on the add columns in the right upper corner.
> You can drag and drop the columns with the arrows to the right to change the order of showing in the task.
> Hit the checkbox to select the column or deselect a column.
Sorting: Here you can choose your way of sorting. Select the column you want to sort by. Then select if you want it ascending or descending.
Filters: Here you can set the filters for the selection of cows for this task. This can be done by basic filters or advanced filters (the advanced filters must be created up front).
With the Basic filters, it possible to select the criteria type:
Hard criteria: When you select this one the tasks must meet these criteria for selecting the cows. If more than one criteria is used and Hard is not marked, the tasks generator will show all animals that meet the criteria (or/or). If hard is marked, it will only show animals that meet that specific criteria (it is ‘and’ and not a or/or).
Ask: When you mark this box, a popup box will appear when opening the task to set the details, like how many days of data it should show.
Without: If this option is selected, the cows that meet this criteria must excluded from the task.
Step 6: When you added all the criteria for this task, click on next.
Step 7: Select the actions you want to connect to this task, like Routing. You can select the main action and two additional actions which are mostly used during the performance of this task.
Step 8: When you selected all actions click on Next.
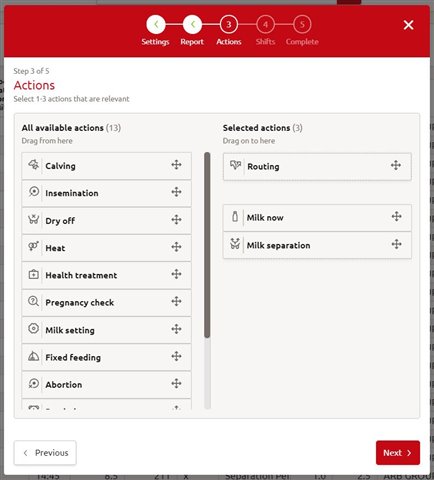
Create a custom task; step 3
Step 9: Select in which shifts this tasks should appear, and on which days in the week. When this should be repeated check if the button repeat schedule is turned on.
Step 10: When you selected the right shifts and days, click on next.
Step 11: Check if all the information and settings are correct. Are they correct click on Complete.
When something isn’t correct, please go back to the right page by clicking the Previous button.
When the task is created successfully a green bar in the top of the screen appears with the message; task is created successfully. The task will appear in the task widget and the task overview in the corresponding shifts/days.
How to adjust an existing custom task?
Step 1: Go to the task page; Manage > People > Tasks
Step 2: Click the 3 dots on the right side of the bar.

Manage page > people > tasks
Step 3: A pop-up appears where you can see the same creation steps, please select the step you want to edit by clicking the number in the top of the screen or hit the next button until you reach the right screen.
Note: greyed out areas are not adjustable.
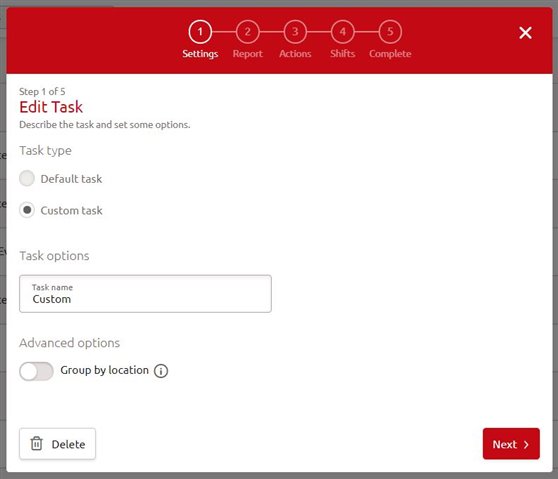
Click the number in the top or hit the next button to navigate to the right screen.
Step 4: When you are finished adjusting the task, go to the last step in the process; step 5 complete and hit the complete button to save the changes. If the adjustments are saved successfully a green bar in the top of the screen appears with the message; tasks are edited successfully.
Create new shift
A shift is a recurring scheduled period of work and consists of one or multiple tasks. Working with shifts is a more efficient. Additionally, a shift can be assigned to a specific person.
How do you create a new shift?
Step 1: Go to Manage > People > Shift management > + > Add shift
Step 2: A new window opens where you can enter:
the name of the shift; the time the shift starts and the time the shift ends.
Step 3: Activate or deactivate the shift.
Step 4: Click on Apply changes to save the changes you have made.
