Turn on automatic heat detection
This functionality automatically registers the cow in heat. The goal is to reduce manual registration and to improve the reliability of KPIs such as ‘interval calving – first heat.’
Automatic heat (Autoheat) is registered for cows with reproduction status ‘open’ or ‘open cyclic’ or ‘inseminated.’ The registration is done the day after the heat is detected, if no action like manual heat registration or insemination is done. For registration purposes, the cow must show 8 hours of consecutive heat, which means 4 red blocks of 2 hours above the threshold. Autoheat registration occurs 24 hours after the onset of heat, providing ample time to identify the cow on the report and take necessary action.
No automatic heat is registered for cows with reproduction status ‘pregnant‘ or ‘keep open.‘ Cows with production status ‘dry off’ are also excluded. Furthermore, there cannot be a heat or insemination in the previous 10 days. Finally, in case of a location event, no cows are registered with automatic heat (20% of the cows in one location, which pass the heat threshold, due to, for example, hoof trimming or herd grazing).
A list of cows marked with automatic heat can be easily found in the default report ‘animal event overview’, which can be found in the reproduction and health category. Use the filter to find heat events.
How to turn on automatic heat detection
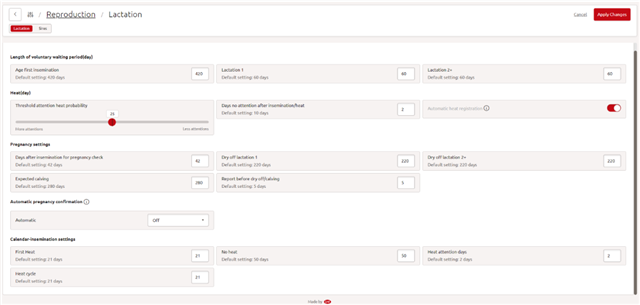
Step 1: Click Manage > Reproduction > Lactation
Step 2: The settings for autoheat are on the page, turn on the slider.

Step 3: Select ‘apply changes’ to save the changes
Lactation settings
Lactation settings are used to manage the cow touches during lactation based on the reproduction status. They can be found via Reproduction dashboard > Manage > Lactation. This page allows you to set the voluntary waiting period, settings around heat indications and attentions, settings around pregnancy checks, automatic pregnancy confirmation and settings related to calculation of dry off date and expected calving.
With these settings adjusted according to your needs, they can be used as input for tasks and/or routings to make sure the cow is in the right place at the right time.
How do you adjust the lactation settings?
Length of voluntary waiting period
Length of voluntary waiting period – Through this setting, you can manage the age at first insemination and the voluntary waiting period (VWP) for lactations 1 and 2+. This determines when cows appear in the heat & insemination tasks and in report 19. In report 19 you can include or exclude VWP cows.
Heat (day)
Threshold attention heat probability – This setting determines the heat threshold at which cows show up on the heat & insemination task (report 19) and determines the heat threshold at which the heat push notifications are sent.
Days no attention after insemination/heat – Via this setting you can manage after how many days a cow can show up again on the heat and insemination task (report 19), after a heat or insemination. Default is set at 10, but 2 or 5 days is also often used. In general, the goal is to reduce the number of cows in this task, but it can be a management decision to reduce the number of days, as some farmers would like to see their cows more often. Or in specific cases, it can help to reduce this number, for example, if you have a cow inseminated on day 60 and when she has a heat detected after 2 weeks she appears on your task, and you decide to inseminate her again. If she is in heat one week after her second insemination (21 days cycle), you may want to inseminate her again, but in this case, she will not appear on the task.
Automatic heat registration – When this setting is turned on, heats will be registered automatically. Find more information here.
Pregnancy settings
Days after insemination for pregnancy check – This setting determines how many days after insemination a cow will show up on the reproduction/pregnancy check task (report 34).
Dry off lactation 1 and 2+ – This setting determines what the expected dry off date will be for a cow. For dry off related settings, click here.
Expected calving – This setting determines the expected pregnancy length which is related to the calving task (report 31).
Reports before dry off/calving – This setting determines how many days before expected dry off and expected calving a cow will show up on related reports (31 & 32) and tasks (dry off & calving).
Automatic pregnancy confirmation
For pregnancy check indication and automatic pregnancy confirmation, click here.
Calendar insemination settings – these settings are mainly helpful in case there is no activity monitoring. The settings are expectations, to let cows show up on report 33 (calendar – expected heat).
First Heat – This setting determines how many days a cow needs to be in lactation before the expected first heat will occur. This information is used to show cows on report 33 (calendar – expected heat).
No Heat – This setting determines at which day in lactation cows will show up on report 33 (calendar – expected heat).
Heat attention days – This setting determines how many days a cow will stay on report 33.
Heat cycle – This setting determines the average expected cycle length. It determines how often the cow shows up on report 33.
Automatic pregnancy registration
Automatic pregnancy registration, automatically registers cows that are pregnant based on days since insemination. The goal of this feature is to reduce the number of cows on the pregnancy check task, reduce manual data entry and to keep KPIs like ‘pregnancy rate’ up to date. There are two options for automatic pregnancy registration, both are explained below.
A list of cows marked with automatic pregnancy, can be easily found in the default report ‘animal event overview.’
How do you turn on automatic pregnancy registration?
Step 1: Click Manage > Reproduction > Lactation
Step 2: The settings for the two options are displayed in this menu.
Off – No automatic pregnancy registration occurs
At day – This option designates the cow as pregnant at x days after insemination, with the ability to customize the timeframe. It only considers inseminations and disregards heat behavior. Therefore, even if a cow exhibits heat behavior, she will still be marked as pregnant after x days, unless there is a new insemination.

Absence of heat – This setting marks animals as ‘autopregnant?’ at day 42, and as ‘autopregnant’ at day 48. It does take into account activity data, as well as manually entered heat and inseminations. Which means that if an animal is in heat, the animal will not change status to ‘autopregnant.’ A heat is defined as 8 hours of consecutive heat probability above the threshold.

Step 3: Select ‘apply changes’ to save the changes
Dry off indication
To detect cows that need to be dried off, hereby it becomes easier to monitor these cows.
How does the dry off indication work?
Cows are automatically added to the dry-off task based on your settings. In order to adjust the dry off settings to your preference:
Manage > Reproduction > Lactation
Here you can set the number of days after insemination that you want to list the cows for a dry off. Set the number of days by dragging the dot over the bar.
Note: You can differentiate for 1st lactation cows.

TIP!: to dry off multiple animals in a quick and easy way, use Batch entry Dry off (Select the animals, and click on the plus button)
TIP!: Make sure all medication and its corresponding waiting time is entered correctly in the Medicines library, to prevent when using a dry off treatment, that separation milk is being pumped into the milk tank.
Important!
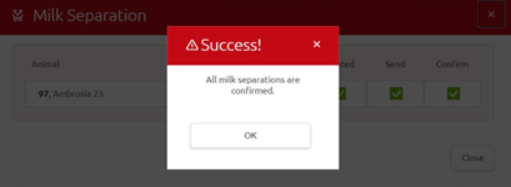
If a milk separation is linked to a dry off treatment, always make sure that milk separation settings are completely confirmed by the robot, a conformation screen appears for the milk separation when all 3 actions are confirmed (Created, Send, Confirm)
Register heat manually
If a cow shows signs of heat in the activity graph, you can register the heat in order to confirm and update the farm registration. Please note that manual heat registration will not include the cow in the heat and insemination task nor on report 19 – conditions – heat probability. For cows in these lists, heat is registered based on activity data.
How do you register a cow in heat?
A cow in heat can be registered in two ways:
An individual cow Multiple cows
1. An individual cow
Step 1: Select the cow to register heat by:
Going to the cow card; Selecting the cow in a task, or Selecting the cow on a report.
Step 2: Click + -> Heat
Step 3: A new window opens where you can:
Choose the applicable action (create or edit heat) in the ‘Heat’ dropdown menu and Select the date to register the heat on the calendar.
If necessary, enter a remark by clicking the textbox.
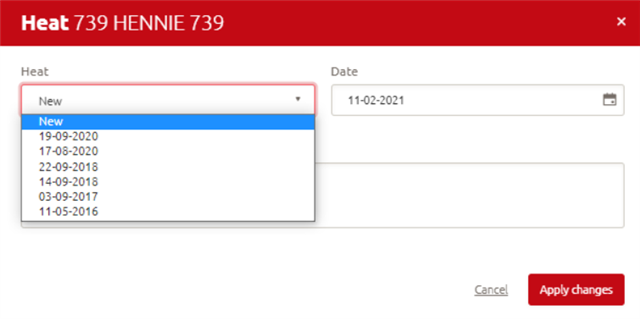
Step 4: Click Apply changes to save the changes you made
2. Multiple cows
Step 1: Select the cows to register heat by:
Selecting the cows in a task or
Selecting the cows on a report.
Step 2: Click + > Heat
Step 3: A new window opens with the total number of cows selected shown in the upper right-hand corner. In this window:
Choose the applicable action (create or edit heat) in the Heat dropdown menu and
Select the date to register the heat on the calendar.
Step 4: Click Apply changes to save the heat for all cows
Register an insemination
This setting is used to register an insemination in Horizon and change the relevant settings to your preferences. Proper insemination registration will assist in managing pregnancy status and dry-off.
How do you register an insemination?
An insemination can be registered in two ways:
1) An individual cow
2) Multiple cows
1. Individual cow
Step 1: Select the cow to register an insemination by:
Going to the cow card; Selecting the cow in a task, or Selecting the cow on a report.
Step 2: Click + -> Insemination
Step 3: A new window opens where you can select:
- The insemination date;
- The insemination type;
- A group of the inseminated cows;
- The person who carried out the insemination and
- The sire used for the insemination.
If necessary, enter a remark by clicking the textbox.
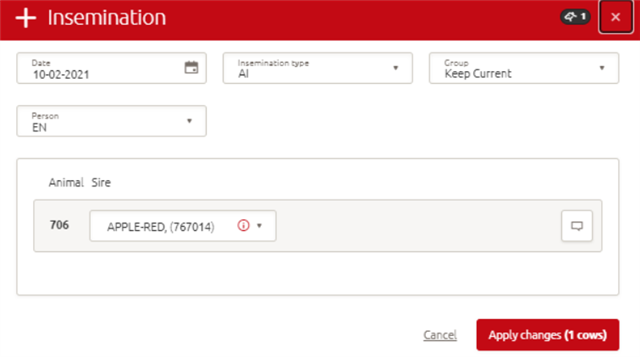
Step 4: Click Apply changes to save the insemination
2. Multiple cows
Step 1: Select the cows to register an insemination by:
Selecting the cows in a task or
Selecting the cows on a report (e.g. repro report).
Step 2: Click + > Insemination
Step 3: A new window opens with the total number of cows selected shown in the upper right-hand corner. In this window, you can register or set the following for all cows:
- The insemination date;
- The insemination type;
- A group of the inseminated cows and
- The person who carried out the insemination.

Step 4: Select sire used for each individual cow in the list as below
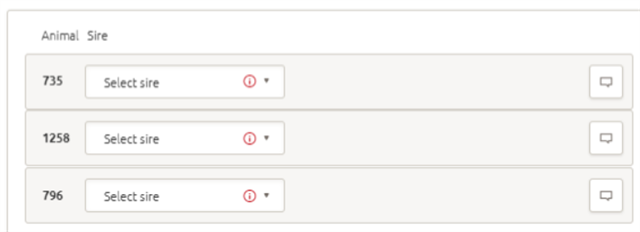
If necessary, enter a remark by clicking the textbox.
Step 5: Click Apply changes to save all inseminations
Register a dry off
To register a dry off in Horizon and change the relevant settings to your preferences.
Important work routine!
- Always enter treatment in Horizon before treating the cow
- Always be sure that if milk separation is needed, milk separation settings are completely confirmed (see step 6)
- Be sure that antibiotic milk is separated from milk in the bulk tank, make sure that all medication is entered into the Medicines Library in Horizon and check the proper waiting time for milk is entered in hours!
How do you register a dry off?
A dry off can be registered in two ways:
1) An individual cow
2) Multiple cows
1. Individual cow
Step 1: Select the cow to register a dry off by:
Going to the cow card; Selecting the cow in a task (e.g. dry off task) or Selecting the cow on a report (e.g. 32 – Calendar – Expected Dry Off).
Step 2: Click + > Dry off
Step 3: A new window opens where you can select:
The dry off date The dry off time
Step 4: Choose one of the three dry off options:
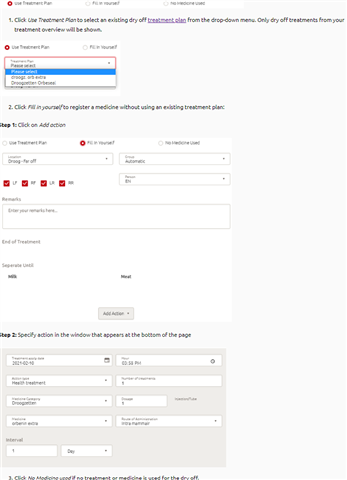
In this window, select:
The location of the cow; The teats that are dried off; The group of the cow and The person who carried out the dry off.
If necessary, enter a remark by clicking the textbox.
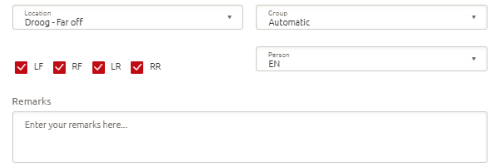
Step 5: Click Apply changes to save the dry off. A confirmation screen appears for the milk separation once all 3 actions are confirmed (Created, Send, Confirm).
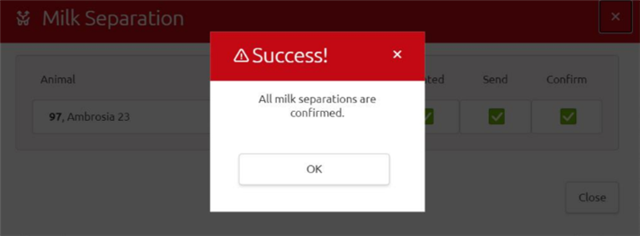
Note: if milk separation is not confirmed, do NOT milk the cow; first contact your Lely Center.
2. Multiple cows
With this option, it is only possible to enter the same actions for all selected cows.
Step 1: Select the cows to register dry off by:
1) Selecting the cows in a task (e.g. dry off task) or
2) Selecting the cows on a report (e.g. 32 – Calendar – Expected Dry Off).
Step 2: Click + > Dry off
Step 3: A new window opens with the total number of cows selected shown in the upper right-hand corner. In this window, select:
- The dry off date
- The dry off time
Step 4: Choose one of the three dry off options:
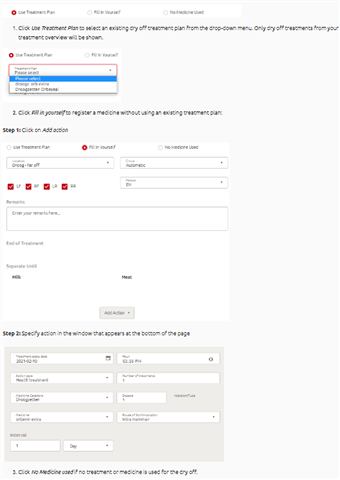
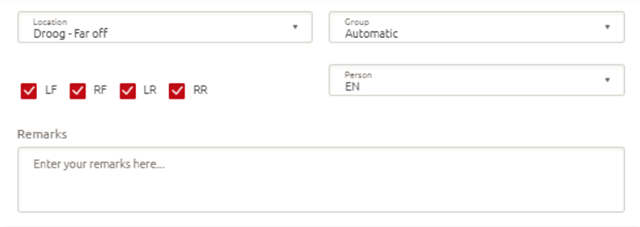
Select:
- The location of the cow;
- The teats that are dried off;
- The group of the cow and
- The person who carried out the dry off.
If necessary, enter a remark by clicking the textbox.
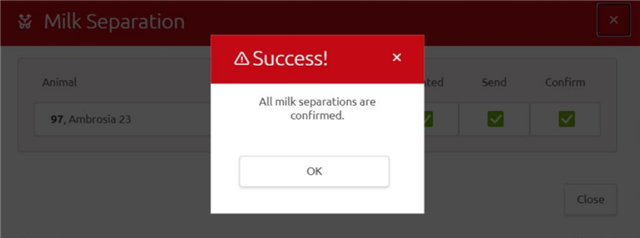
Step 5: Click Apply changes to save the dry off. A confirmation screen appears for the milk separation once all 3 actions are confirmed (Created, Send, Confirm).
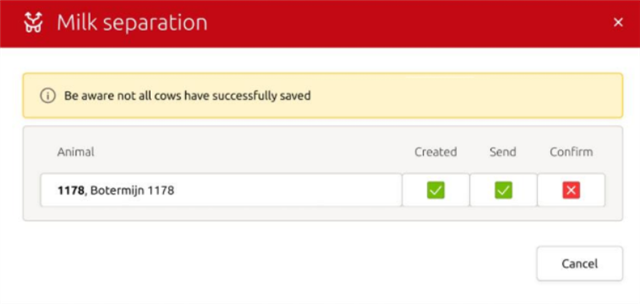
Note: if milk separation is not confirmed, do NOT milk the cow; first contact your Lely Center.
Register a calving
Every time a calf is born, you need to confirm the calving in Horizon and change the relevant settings according to your preference.
How do you register a calving?
A calving can be registered in two ways:
An individual calving Multiple calvings
1. Individual calving
Step 1: Select the cow that calved by:
1) Going to the cow card;
2) Selecting the cow in a task or
3) Selecting the cow on a report (e.g. repro report).
Step 2: Click + > Calving
Step 3: Change the settings according to your preferences in the new window that opens. Milk separation, animal location, calving remarks and information about the new-born calf can be entered here.
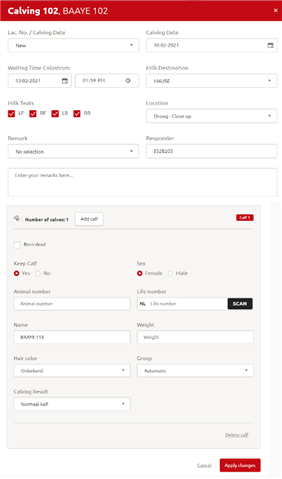
If there is a twin, you can click on Add calf and an additional information page for calf 2 will appear.
Step 4: Click Apply changes to save the changes. A confirmation screen appears for the milk separation once all 3 actions are confirmed (Created, Send, Confirm).
Note: if milk separation is not confirmed, do NOT milk the cow; first contact your Lely Center.
2. Multiple calvings
Step 1: Select the cows that calved by:
1) Selecting the cows in a task, or
2) Selecting the cows on a report (e.g. repro report).
Step 2: Click + > Calving
Step 3: Change the settings according to your preferences in the new window that opens for the first selected cow. Milk separation, animal location, calving remarks and information about the new-born calf can be entered here.
The total number of cows selected is shown in the upper right-hand corner of the window.
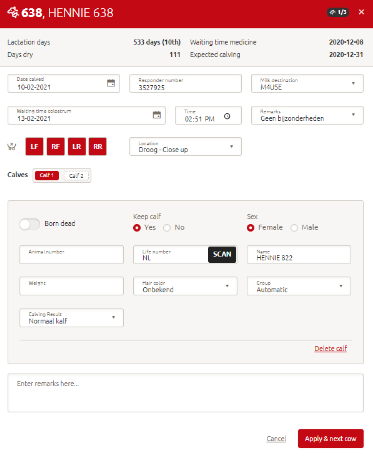
Step 4: Click Apply & next cow to apply changes for this calving and move on to the next.
Step 5: Click Apply changes after you have been through all calvings to save the changes. A confirmation screen appears for the milk separation once all 3 actions are confirmed (Created, Send, Confirm).
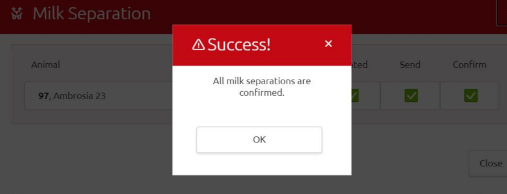
Note: if milk separation is not confirmed, do NOT milk the cow; first contact your Lely Center.
Reproduction analysis
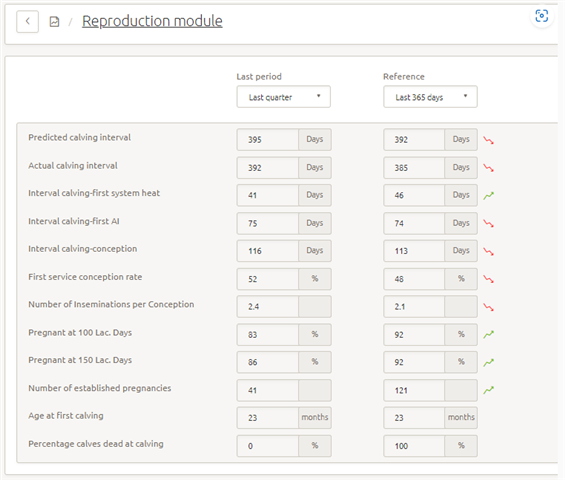
This analysis provides an overview of the actual reproduction indicators for the last year, last quarter, or last month. In this article, we explain where to find the analysis and how to use it.
Where can you find the reproduction analysis?
Go to the reproduction dashboard and navigate to the reports tab. The reproduction analysis button can be found at the top of the page.
How do you use the reproduction analysis?
In the analysis, it is possible to compare multiple time periods by changing the time frame at the top of the page. The time periods available are 30 days, last quarter, and last year. In the reference column, it is also possible to select ‘reference.’ This will result in empty cells, which can be filled in with your reference or goal value. The values will be remembered for when you select ‘reference’ next time.
The pregnancy rate explanation and calculations can be found here.
Sires
Artificial insemination (AI) sires can be entered in the Horizon Library. When the sires are in the library, they can be chosen when executing an insemination.
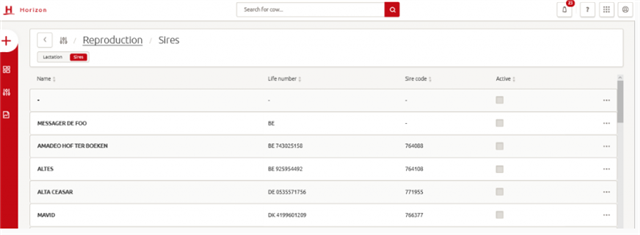
How do you create a new sire?
Step 1: Click Manage > Reproduction > Sires > + > Sire
Step 2: A new window opens where you can enter:
- The number of the sire;
- The name of the sire;
- The life no of the sire;
- The sire code and
- If the sire is actively used or not.
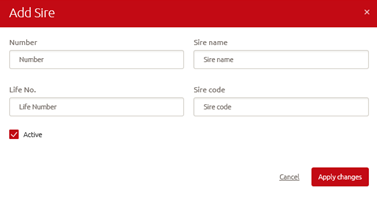
Step 3: Click Apply changes to save the changes you made
How do you edit a sire?
Step 1: Click Manage > Reproduction > Sires
Step 2: Click the sire you want to edit.
Step 3: A new window opens where you can edit:
- The number of the sire;
- The name of the sire;
- The life no of the sire;
- The sire code and
- If the sire is actively used or not.
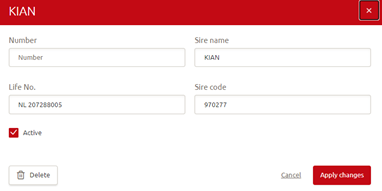
Step 4: Click Apply changes to save the changes you made
TIP! Keep the sire list up to date. Sires which are not used anymore should be de-activated in the library using the edit button. This will keep the search list within the insemination screen shorter/clearer.
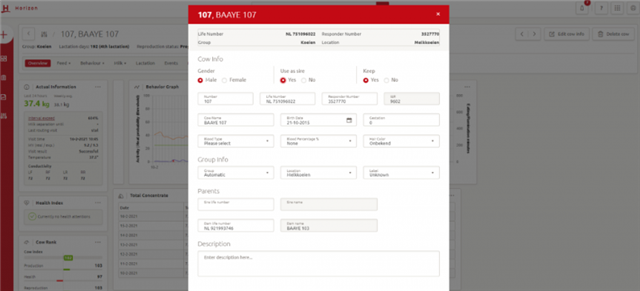
On a farm, bulls (e.g. for heifers) must be entered as a real animal in the database, and in the Cow Card the setting Gender must be set to Male and Use as a Sire must be set to Yes.
Sire advice
Choosing the best bull for a cow can be a challenge. Farmers use programs such as SAP (Sire Advice Program from CRV) to identify the best choice for each cow. Farmers that are part of the SAP can make use of the sire advice in Horizon. When choosing to inseminate a cow, the top three sire choices according to SAP are shown in Horizon. This means that the farmer does not have to find the SAP advice in VeeManager first, but can use Horizon to find the sire advice directly from SAP.
Where can the sire advice be found?
For a single entry: Cow card > + button > Insemination > insemination screen will pop up > click on dropdown arrow > click on first, second or third sire choice
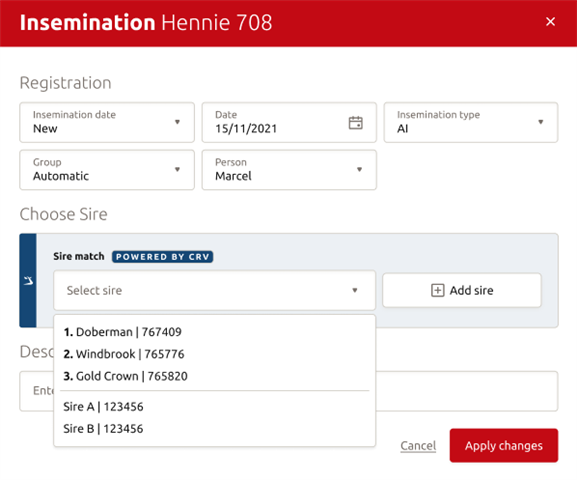
For batch entry: Dashboard > + button > Insemination > insemination screen will pop up > select cows for insemination > click on dropdown arrow to find the top three sire choices per cow
Other remarks:
- Sire advice is available to farmers in Benelux countries who are in the SAP programme provided by CRV
- The sire advice comes from CRV, and CRV will be notified of the final sire choice
- Sexed semen options will be included in a later version
- In the future, other countries and reproduction companies will obtain access to the sire advice
- Enable connection to third party: Manage > Data exchange (Join Data)
