This library is used to add mixed rations fed by the Vector and shows which rations are currently active. Two steps need to be filled out per ration. The first step provides an overview of the ration, or you can create a new ration. Components can be selected and amounts can be set in kg/lbs. DM per animal and in kg/lbs fresh product per animal. The second step is to set up the loading order in % per loading step; each product needs to add up to 100% (if not, it will not be possible to apply changes).
How do you create and manage a ration?
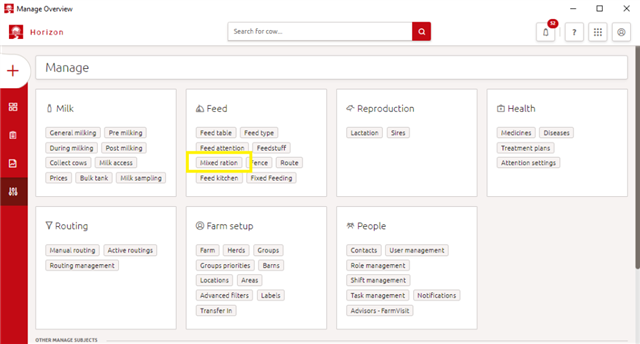
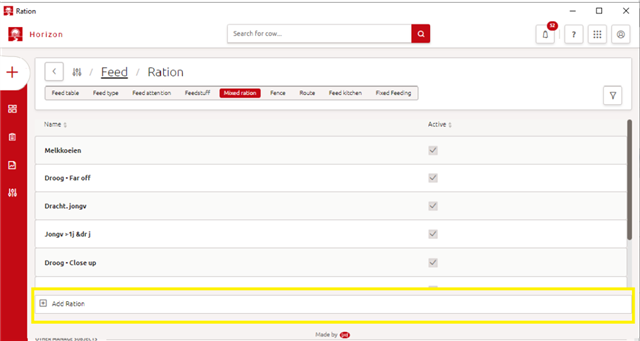
Step 1: Go to ‘Manage’ > ‘Feed’ > ‘Mixed Ration’ > ‘Add ration’


Step 2: Setting up a ration (step 1)
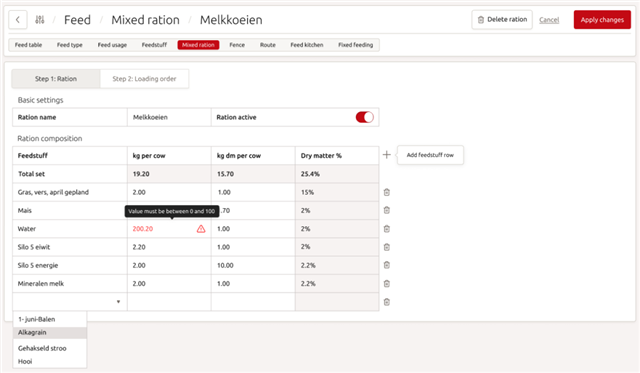
- Basic settings
- Enter ration name
- Make ration active if needed (ration will be automatically fed).
- Ration composition
- The plus sign is used to add a feedstuff from the library (top right-hand corner of the table).
- The garbage icon is used to remove a feedstuff (at the end of each row of feedstuff).
- The white cells in the table are adjustable; the grey sections are completed automatically.
- Once the composition is correct, go to loading order or apply changes.
- Components can be selected and amounts can be set in kg/lbs. DM per animal and in kg/lbs product per animal.

Step 3: Loading order
- Basic settings
- Counter knife: determine the initial product length of the ration and set the counter knife. The counter knife in the MFR of the Vector system affects the mixing and cutting of feed particles.
There are 4 options:
- Off: the counter knife is switched off in case the initial product is already very finely cut and/or hardly needs additional mixing/cutting.
- Short: the initial product length of the ration is < 5 cm; the counter knife stays inserted in the bin a short period of time to enhance cutting/mixing performance.
- Medium: the initial product length of the ration is between 5 cm and 10 cm; the counter knife stays inserted in/withdrawn from the bin for the same length of time to enhance cutting/mixing performance.
- Long: the initial product length of the ration is > 10 cm; the counter knife stays inserted in the bin for a longer period of time to enhance cutting/mixing performance.
- Post mixing: once all the required feedstuffs have been loaded, post mixing commences. The desired duration of post mixing can be set.
- Maximum load: enter the maximum load. Make sure the maximum fill volume of the bin does no exceed 80% to maintain a good mixing quality and prevent overcooking. The maximum load can be lowered for voluminous rations with, for instance, a large portion of hay and straw. This prevents the MFR from overcooking.
- Minimum load: this setting can be used to improve the mixing quality of the ration for fences that only receive small amounts of feed. When setting a minimum load value, the Vector system will not start feeding if the total amount in the bin is less than the set minimum amount.
It will check if, by using combined feeding software, fences can be combined to make sure the minimum set value is reached.
If combined feeding is not possible, the fence in question will have to wait until there is a feeding request at another fence with the same ration.
Only use this setting when there are fences on the farm that receive a small amount and can be combined with other fences.
When making use of this setting, Lely advises choosing an amount of feed that fills the bin till the top of the auger since this will increase mixing performance.
Step 4: The loading order of a mixed ration contains the following succession of steps:
A) Loading of feedstuffs in a fixed order – if there are multiple feedstuffs to be added to this step (e.g. hay and straw), it means that the feed grabber will first load all the desired hay and thereafter start loading all the desired straw.
B) Loading of feedstuffs in a random order – if there are multiple feedstuffs to be added to this loading step (e.g. grass silage and alfalfa), the feed grabber will alternately grab grass silage and alfalfa. Feedstuffs loaded in random order will need less mixing.
C) In between mixing – during the entire loading process, the mixer auger of the MFR is turning. During the in-between mixing step, no feed is added to the bin. The desired duration of in-between mixing can be set.
D) Loading of feedstuffs in a random order – if there are multiple feedstuffs to be added to this loading step (e.g. grass silage and alfalfa), the feed grabber will alternately grab grass silage and alfalfa. Feedstuffs loaded in random order will need less mixing. This step is the same as step B.
E) Loading of concentrates and minerals – this step determines at which percentage of the total load concentrates and minerals will be added to the bin. As a guideline, a percentage between 50% and 60% is advised. F) Post mixing – once all the desired feedstuffs are loaded, post mixing will start. The desired duration of post mixing can be set.
In case there are no feedstuffs assigned to a step, the step is skipped when loading the MFR. Feedstuffs can be dragged and dropped between the steps of the loading order using the symbol shown below.

Lely has defined guidelines for the loading/mixing order to create a homogeneous mixed ration. If you want to find out more, please visit this page.
To change the loading order
- Loading order in % per loading step: each product needs to be addressed 100% (if this is not reached, it will not be possible to apply the changes)
- % to start adding concentrates, minerals and vitamins
- The plus sign is used to add a feedstuff from the composition to the specified loading step (at the top right-hand corner of each loading step)
- The garbage can icon is used to remove a feedstuff from the specified loading step (at the end of each row of feedstuff)
- The entire 100% of a feedstuff of the composition needs to be completed on this page. The composition status gives you an overview if everything is addressed (below the basic settings for the loading order)
- The white cells in the table are adjustable; the grey sections are completed automatically
To apply the changes to the composition and the loading order, click on the ‘Apply changes’ button in the top right-hand corner of the screen.
The benefit of having a separate composition page and loading order page is that the loading order does not need to change if the composition slightly alters.
Note: to assign the ration to a location with animals, go to ‘Manage’ > ‘Feed’ > ‘Fence’. For more information about the fence page, please visit this help page.
