Manual routing
To route animals to different areas on the farm in a quick and easy way. This will help in making cow touches easily to perform.
How does the routing of animals work?
There are three types of routing: manual routing, automatic routing and scheduled routing. This section explains what manual routing is.
You can enter a routing for a cow using the plus bu
tton. Animals that have been routed to an area will automatically be shown on the Routing overview task.
Step 1: Select the cow to route manually by:
1) Going to the cow card;
2) Selecting the cow in a task, or
3) Selecting the cow on a report.
Step 2: Click + > Routing
Step 3: A new window opens where you can:
Create a new routing
Select the start date
Select the end date
Select to what area the animal should be routed
Choose if the routing should take place only after milking
Choose if the routing should be active all day
Choose if the routing should be performed every time or
Edit an existing routing.
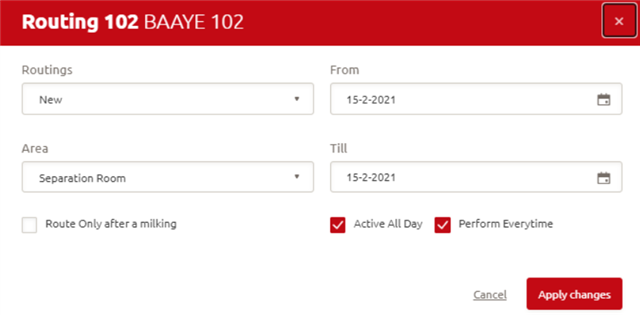
Step 4: Click Apply changes to save the routing you have created or edited
TIP!: to route multiple animals in a quick and easy way, use batch entry routing. Select the animals in a task or in a report and follow step 2 till 5 for multiple cows.
Active routings
Active routings provide an overview which cows have a routing task at the moment.
Go to Manage > Routing > Active routings to get the following overview of your routings:
Tip: make sure you have your separation areas entered in Horizon [Manage > Farm setup > Routing areas].

In this overview some routing details are shown:
Cow ID
NameRobot number
Lactation number
Lactation days
Task name: reason why this cow is being routed
Routing area name: the area the cow is going to be routed to
Routing from – till: timeframe of the routing
From – till time: timeframe in which the cow will be routed
Last routing direction: Where is the cow routed to after her last milking
TIP! Clicking on the Cow ID will take you to the cow card.
In this overview it’s possible to pause a active routing, meaning the routing isn’t ended because the cow still meets criteria that triggered the routing. However she will not been routed during a pause.
How to pause a routing:
Step 1: Select the cows that need their routing to be passed
Step 2: Click the Pause button
When the routing is paused, this will be visible in the last column.
How to activate a routing after a pause:
Step 1: Select the cows that need their routing to be passed
Step 2: Click the Set active button
Routing management
Within the routing options, there are certain possibilities to route a cow on a particular day and/or based on certain criteria (e.g. 100 days in lactation, or attention for udder health). The proper setup of routing tasks can be helpful with daily routines.
Where can you find routing management?
Go to Manage –> Routing –> Routing Management
Opening this page provides an overview of the animal groups, and clicking on the herd or one of the groups will bring you to the settings for the herd or that specific group. The routing overview is split in three categories: automatic routing, scheduled routing and grazing. How they work will be discussed below.
Automatic routing
Automatic routing has the highest routing priority and can be done at herd or group level. In the top right-hand corner, you can select the herd or group you want to set the routing for.
Based on pre-set selected criteria, Horizon selects and automatically routes cows to the appointed separation area based on the criteria. You can personalize this by (de)activating the automatic routing and/or by setting the times of the day you want to have automatic routing active. Animals may fit multiple routing criteria and the decision where to send the cow is based on the priority.
The order of priority of automatic routing cannot be changed.
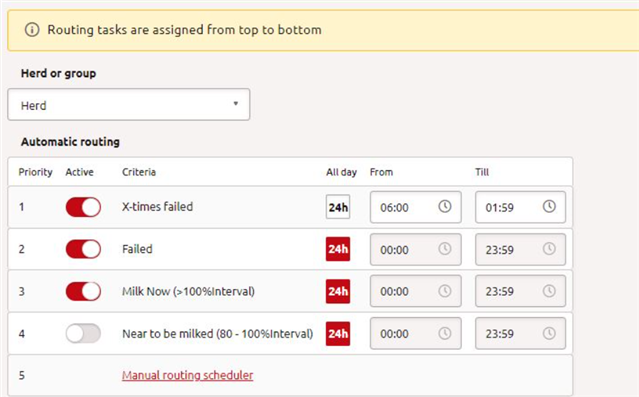
Automatic routing settings displayed in Horizon
Automatic routing options
X times failed
When active, all cows with X time failure are routed. Set the ‘X’ at your robot.
Failed
When active, all cows with an unsuccessful milking are routed.
Milk now
Where the cow’s milk interval exceeds at least 100% the cow will be sent in a set direction. Mainly for farms with a Grazeway, to route all cows to the pasture or robot.
Near to be milked
Where the cow’s milk interval exceeds X % (a setting that can be changed in the Milk access table), but remains below 100%, then the cow will be sent in a set direction. Mainly for farms with a Grazeway, to prevent cows from going outside that need to be milked.
5. Manual routing scheduler
Manual routing has second priority and can be set via the plus button. This is discussed in the Manual routing help page.
Routing schedule
Scheduled routing has the lowest priority and makes it possible to separate individual cows or a group into a separation area. This can be set based on different criteria, (e.g. recurring routing tasks like insemination, hoof health, insemination) in the separation room on a fixed day. Or a routing task for dry off cows on a fixed day.
These kinds of tasks can be entered at group or herd level, where group level has priority.
The scheduled routing task has priority. Multiple scheduled tasks on the same level are validated based on the priority field, whichever task is found to be active for a cow, that task is going to be active and settings will be sent accordingly.
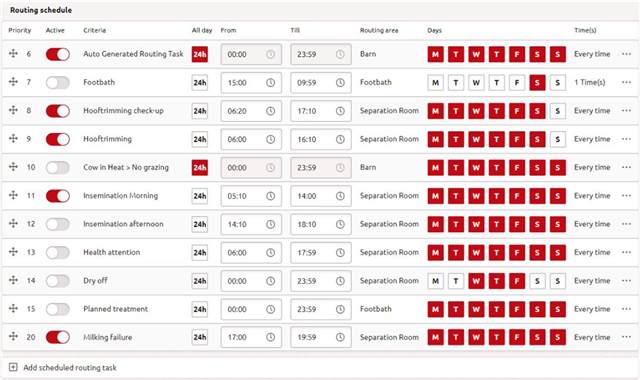
Routing schedule displayed in horizon
In the scheduled routing overview, you can change the settings for the scheduled routings:
(De)activate the routing by clicking on the toggle button in the Activate columnSpecify if the routing should be active all day, or only part of the day. When the 24 hr button is selected, routing is active all day.(De)select the days of the week the scheduled routing is active Change the priority of the routings by dragging and dropping the row; you can do this by selecting the arrowed cross Add a new scheduled task at the bottom of the scheduled routing settings
If you want to change more details for a specific scheduled routing, you can click on the three dots at the end of the row and click on Edit. A new screen will open:
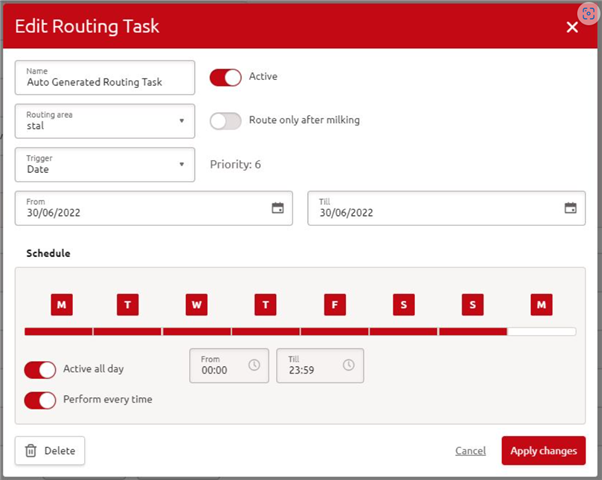
Pop-up screen for editing a routing task
Name: Name of the routing task
Active: Enable or disable the routing task
Routing Area: Destination of the cow
Priority: Task priority number at this level
Trigger:
Always: All cows fit this task. It doesn’t filter any cow outDate: Works based on the selected date rangeAdvanced Filter: Filters the cows, task becomes available for eligible cows
Schedule: Enabling /disabling the task for selected days of the week
All Day: Enabling /disabling the task for selected time range Can be selected past midnight.
Perform: Limiting working count to a number. Task will expire after x amount of execution.
Route Only After Milking: Whenever the milk interval is above (or equal to) 100%, then the task becomes available. After a successful milking the task stays active for another 30 minutes, due to tandem routing.
Grazing/milked
If cows are grazing and a Grazeway is used, you can use the Grazeway to route the cow in the direction you want, for example to the barn or to the pasture, based on several parameters.
Important: before activating the grazing routing, first set the routing directions; you can do this by going to Manage -> Devices -> Device configuration -> Grazeway
1. Set/check the default direction
2. Activate the grazing direction you want to use (Grazing A, B, C and/or D)
3. Mark routing direction 2 for grazing
4. Apply changes
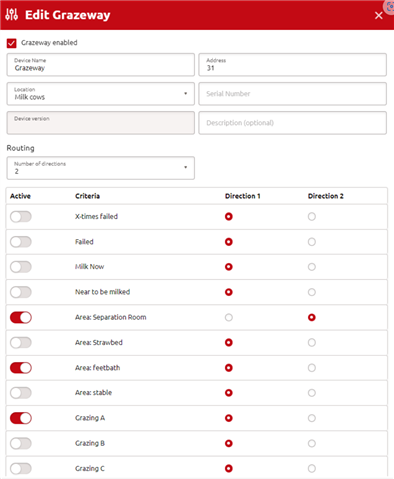
Grazeway settings on the device configuration page
Set up grazing routing
Options Grazing A, B, C and D are only available if the Grazing enabled toggle is activated. This setting eases to start and end grazing for the farm.
1. Set/check the grazing interval
2. Activate ‘Grazing enabled’
3. Activate ‘Grazing A (B, C and/or D)
4. Apply changes
The grazing interval is set by default at 80%, meaning that if a cow reaches 80% of her calculated milking interval, she will not be allowed to go outside.
Example:
Cow is allowed to be milked 4 times per day. Time between milkings: 6 hours. Grazing interval: 80%. If this cow spends 80% of the 6 hours (4.8 hours), the Grazeway will not allow her to go outside.
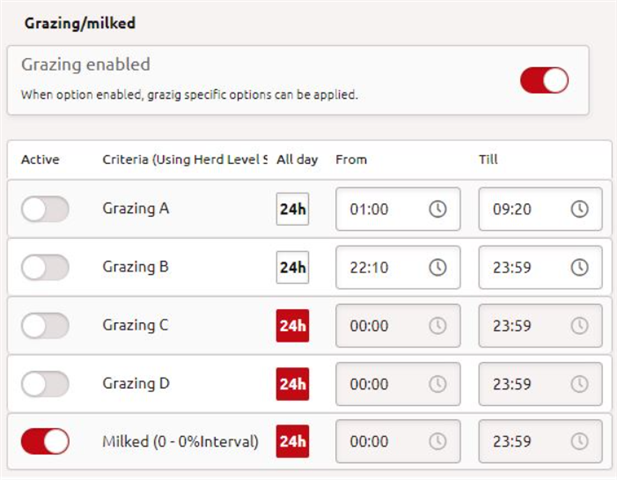
Grazeway settings on the routing management page
Note: to set an automatic routing task for grazing Dry cows, use the Group Setting and only Grazing A (B, C or D) must be activated. See screenshot below. To set a routing task, for example for dry cows. Do not use the herd settings but instead select a group of cows you want to adjust the settings for, and de-activate the herd setting.

Herd settings are deactivated
