


Before the actual start-up day, Horizon needs to be set-up with farm-specific information such as cow/lactation information, feed types and medicines. Enter all the required data and set the locations if needed. This data needs to be entered before start-up since the first milkings cannot otherwise take place.
What information should be entered?
For a good start-up, the following cow data information should be entered:
Animal number Responder/tag number Lactation number (to be able to make different settings for heifers) Calving date (to separate colostrum and obtain proper graphs and calendar info) Insemination date (to have proper dry-off indications) Pregnancy confirmation date (to get animals on dry-off list) Dry-off date (to disable milking of dry cows)
In addition to the aforementioned information, please take extra care that the following information is entered correctly prior to the start-up of the robot:
- Milk separations: milk containing antibiotics which must be separated from the bulk tank.
- Three-teat cows: teats which should not be milked.
- Feed settings: to encourage cows to visit the robot.
- Milk settings: to determine when cows are due for milking.
In addition to the required cow data information, the farm details and farm setup also need to be entered before start-up.
Where can you find these settings?
Step 1: Enter cow data
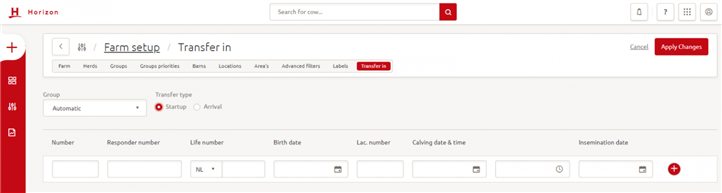
Go to Manage -> Transfer In -> Fill in all required information
To enter cow data, go to the left-hand red menu bar and click on the Manage option. Once you are there, click on the Transfer In option on the Farm setup box. Once you have opened the page, enter the required data. Make sure you select Startup as the Transfer type. This page is used to add multiple animals. At the top right of the screen, click on Apply changes to save the entered data.
Step 2: Enter farm details
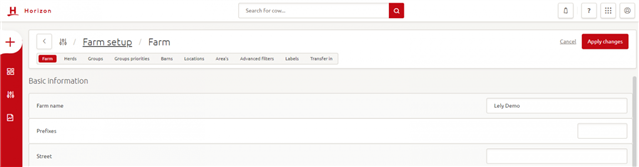
Go to Manage -> Farm -> Fill in all required information
To enter farm details, go to the left-hand red menu bar and click on Manage. Once you are there, click on the Farm option in the Farm setup box. Once you have opened the page, enter the required data. At the top right of the screen, click on Apply changes to save the entered data.
Step 3: Enter farm setup
The farm setup consists of multiple entries for information. In order to have the farm setup filled in before start-up, the following information needs to be entered:
Add locations
Go to Manage -> Locations -> Add and modify locations
To add locations, go to the Manage overview and click on Locations. This is part of the Farm setup box. Once in the Location overview, add locations with the + icon at the bottom of the screen. Existing locations can be modified by clicking on the three dots on the right-hand side of the screen.
Device configuration
Go to Manage -> Device configuration -> Add and modify devices
To add devices, go to the Manage overview and select Device configurations. This is part of the Devices box. Once in the Device configurations overview, add devices with the + icon on the bottom of the screen. Existing devices can be modified by clicking on the three dots on the right-hand side of the screen.
Important: with the device configuration, you can link the devices to the correct location. Make sure all devices are linked to a location. The cows will be shown in the right location after a visit to one of the devices.
Create groups and set priorities
Go to Manage -> Groups -> Add and modify groups
To add locations, go to the Manage overview and select Groups. This is part of the Farm setup box. Once in the Groups overview, add groups with the + icon at the bottom of the screen. Existing groups can be modified by clicking on the three dots on the right-hand side of the screen.
Go to Manage -> Groups priorities -> Add and modify groups
In order to change group priorities, go to the Manage overview and select Groups priorities. This is part of the Farm setup box. Once in the Groups priorities overview, you can assign certain groups higher priority. Lely Horizon checks the priority of the list from top to bottom. If the cow belongs in the first group, she will be allocated to that group.
Brush & liner settings
Go to Manage -> Device status -> Insert the liner type, last liner change and last brush change
To add the liner type, go to the Manage overview and select Device status. This is part of the Devices box. Once in the Device status overview, enter and modify any information via the three dots on the right besides each device. For Astronaut devices, you will be able to enter liner and brush information. This will help the system in calculating the next advised moment to change the liners and brushes.